
What is a Brewing Kit?
A brewing kit is a comprehensive package containing all the essential equipment and ingredients needed for homebrewers to craft their own beer, wine, or other fermented beverages. It serves as a convenient and cost-effective starting point for those new to the hobby, providing everything required to begin brewing in one convenient bundle.
Brewing kits typically include a fermenting vessel, such as a plastic or glass carboy, along with an airlock and stopper to allow carbon dioxide to escape during fermentation while preventing air and contaminants from entering. Additionally, they often contain a bottling bucket, siphon tubing, bottle filler, and capper for bottling the finished product.
Beyond the equipment, brewing kits also supply the necessary ingredients like malted grains, hops, yeast, and any additional flavorings or adjuncts specific to the beer style being brewed. These ingredients are carefully measured and packaged, ensuring consistent results and taking the guesswork out of ingredient quantities for beginners.
The purpose of a brewing kit is to provide a comprehensive and convenient solution for aspiring homebrewers, allowing them to dive into the craft with minimal initial investment and without the need to source individual components separately. With a brewing kit, enthusiasts can focus on learning the brewing process and experimenting with different styles and recipes, rather than worrying about acquiring all the necessary equipment and ingredients individually.
Table of Contents
Types of Brewing Kits
Brewing kits come in various forms, catering to different beverage types and brewing preferences. Here are some of the most common types of brewing kits available:
Beer Brewing Kits: These kits are designed for brewing different styles of beer, such as ales, lagers, stouts, and IPAs. They typically include ingredients like malted grains, hops, yeast, and brewing equipment like a fermenter, bottling bucket, and bottles or caps.
Wine Brewing Kits: For those interested in making their own wine at home, wine brewing kits provide all the necessary ingredients and equipment. These kits often include concentrated grape juice or juice blends, yeast, clarifying agents, and basic winemaking equipment like a fermenter, siphon, and bottles.
Cider Brewing Kits: Cider brewing kits are perfect for those who prefer the crisp and refreshing taste of hard cider. These kits usually contain apple juice concentrate, yeast, and the necessary equipment for fermentation and bottling.
Kombucha Brewing Kits: As the popularity of kombucha continues to rise, kombucha brewing kits have become increasingly available. These kits typically include a SCOBY (symbiotic culture of bacteria and yeast), starter liquid, tea blend, and a fermentation vessel.
Mead Brewing Kits: For those interested in exploring the ancient art of mead brewing, mead brewing kits provide the necessary ingredients and equipment. These kits often include honey, yeast, and fermentation vessels, along with instructions for creating different mead varieties.
Hard Seltzer Brewing Kits: In response to the growing demand for hard seltzers, hard seltzer brewing kits have emerged. These kits typically include a base sugar or malt extract, yeast, and flavorings or fruit concentrates, allowing brewers to create their own unique hard seltzer flavors.
No matter your beverage preference, brewing kits offer a convenient and accessible way to explore the world of homebrewing, providing all the essential components in one package.
Benefits of Using a Brewing Kit
Brewing kits offer numerous advantages for both novice and experienced homebrewers. One of the primary benefits is convenience. These kits come with pre-measured ingredients and detailed instructions, eliminating the need to source and measure individual components. This streamlined process saves time and reduces the chances of making mistakes, making it an ideal option for those new to homebrewing.
Cost-effectiveness is another significant advantage of using a brewing kit. By purchasing a kit, you can avoid the expense of acquiring individual equipment and ingredients separately, which can quickly add up. Additionally, many kits are designed for small-batch brewing, allowing you to experiment with different styles without committing to large volumes, reducing waste and saving money.
Quality control is a crucial aspect of homebrewing, and brewing kits can help ensure consistent results. The ingredients included in these kits are carefully selected and measured, ensuring that you achieve the desired flavor profile and alcohol content. Furthermore, reputable kit manufacturers often provide detailed instructions and guidance, helping you navigate the brewing process with confidence.
Consistency is another benefit of using a brewing kit. With pre-measured ingredients and clear instructions, you can replicate your favorite brews time and time again. This consistency is particularly valuable for those who have perfected a recipe and want to recreate it with ease. Additionally, brewing kits can serve as a reliable starting point for experimentation, allowing you to make minor adjustments and tweaks to explore different flavor profiles.
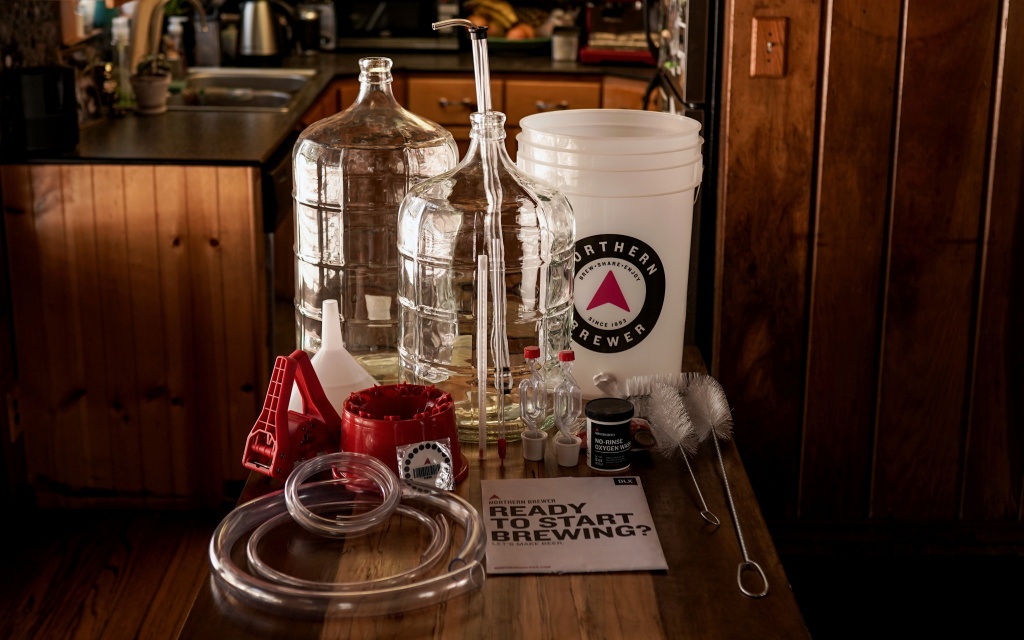
Essential Equipment in a Brewing Kit
A typical brewing kit comes equipped with all the necessary tools and ingredients to get you started on your homebrewing journey. The essential equipment found in most kits includes:
Fermentation Vessel: This is the primary container where the fermentation process takes place. Brewing kits usually include a food-grade plastic bucket or a glass carboy, along with an airlock that allows carbon dioxide to escape while preventing air from entering.
Bottling Equipment: After fermentation, you’ll need to bottle your brew. Kits generally include a bottling bucket with a spigot, a bottling wand, bottle caps, and a capper. Some kits may also include bottles, but you can often reuse clean, pry-off bottles.
Ingredients: The heart of any brewing kit lies in its ingredients. Most kits come with a pre-measured amount of malt extract (liquid or dried), hop pellets or cones, and yeast. Some kits may also include additional flavorings or adjuncts, such as spices or fruit extracts.
Instructions: Every brewing kit includes detailed instructions to guide you through the brewing process. These instructions typically cover sanitization, boiling the wort (unfermented beer), adding hops, pitching the yeast, fermentation, bottling, and conditioning. Following the instructions carefully is crucial for producing a high-quality homebrew.
With these essential pieces of equipment and ingredients, a brewing kit provides everything you need to brew your first batch of beer, cider, or wine right at home. As you gain experience, you can expand your setup with additional tools and experiment with more advanced recipes.
Choosing the Right Brewing Kit
Selecting the appropriate brewing kit is crucial for a successful homebrewing experience. Several factors should be considered to ensure the kit aligns with your goals and preferences.
Skill Level: Brewing kits cater to different skill levels, ranging from beginner-friendly options to more advanced setups. Beginners may opt for kits with straightforward instructions and pre-measured ingredients, while experienced brewers might prefer kits that offer more control and customization options.
Batch Size: Brewing kits are available for various batch sizes, typically ranging from 1 gallon to 5 gallons or more. Consider your desired output and storage capacity when choosing a kit. Smaller batches are ideal for those new to homebrewing or with limited space, while larger batches suit experienced brewers or those brewing for larger gatherings.
Style Preferences: Brewing kits often specialize in specific beer styles, such as ales, lagers, IPAs, stouts, or wheat beers. Determine your preferred beer styles and look for kits tailored to those styles. This ensures the included ingredients and instructions are optimized for the desired flavor profile and brewing process.
Additionally, consider factors like the kit’s reputation, included equipment quality, and the availability of customer support or online brewing communities for guidance. Taking the time to evaluate your needs and preferences will help you select a brewing kit that delivers a rewarding and enjoyable homebrewing experience.
Brewing Process with a Kit
The beauty of a brewing kit lies in its simplicity and ease of use, making the brewing process accessible to beginners and experienced homebrewers alike. Here’s a step-by-step guide to brewing with a kit:
- Sanitization: Before you begin, ensure that all equipment is thoroughly sanitized to prevent contamination and unwanted bacteria growth. Most kits include a no-rinse sanitizer solution or sanitizing tablets.
- Steep the Grains: If your kit includes grains, you’ll need to steep them in hot water to extract the sugars and flavors. Follow the kit’s instructions for steeping time and temperature.
- Boil the Wort: Once the grains have been steeped, transfer the liquid (known as the wort) to your brew pot and bring it to a boil. At this stage, you’ll add the hop pellets or extracts provided in the kit, following the recommended boil times for each addition.
- Cool the Wort: After the boil, you’ll need to quickly cool the wort to a temperature suitable for yeast pitching. Some kits include a wort chiller, while others recommend an ice bath or immersion chiller.
- Pitch the Yeast: Once the wort has cooled to the appropriate temperature, it’s time to pitch the yeast provided in the kit. Gently sprinkle the dry yeast over the wort or follow the instructions for liquid yeast.
- Fermentation: Transfer the wort to your fermenter (often a plastic bucket or carboy), seal it with an airlock, and let the yeast work its magic. Most kits will provide fermentation temperature guidelines and timelines.
- Bottling or Kegging: After the primary fermentation is complete, you’ll need to transfer the beer to bottles or a keg for conditioning. Kits typically include caps, bottles, and instructions for priming (adding a small amount of sugar to allow carbonation).
- Conditioning: Allow the beer to condition for the recommended time, usually two to four weeks for bottles or one to two weeks for kegs. During this time, the beer will carbonate and develop its final flavors.
- Enjoy!: Once the conditioning is complete, your homebrew is ready to be enjoyed! Chill, pour, and savor the fruits of your labor.
Remember, while kits provide a convenient and foolproof way to brew, don’t be afraid to experiment and put your own spin on recipes as you gain experience. Happy brewing!
Cleaning and Sanitization
Proper cleaning and sanitization are crucial steps in the brewing process, as they help prevent contamination and ensure the quality and safety of your beer. Neglecting these steps can lead to off-flavors, spoilage, and potential health risks.
Cleaning involves removing visible dirt, residue, and debris from your brewing equipment. This can be done using a combination of hot water, a brewery-specific cleaner (like Powdered Brewery Wash or PBW), and scrubbing. Pay special attention to areas that are difficult to reach, such as the inside of tubing, valves, and nooks and crannies.
Sanitization, on the other hand, is the process of killing any remaining microorganisms that could contaminate your beer. This step is typically done after cleaning and just before brewing. Common sanitizers used in homebrewing include Star San, Iodophor, and bleach solutions. Always follow the manufacturer’s instructions for proper dilution and contact time.
When sanitizing, it’s essential to ensure that all surfaces that will come into contact with your wort or beer are thoroughly sanitized. This includes fermenting buckets or carboys, airlocks, racking canes, hoses, and bottling equipment. Some brewers also choose to sanitize their brewing water to eliminate any potential contaminants.
One effective technique for sanitizing is to create a sanitizing solution and submerge your equipment in it for the recommended contact time. Alternatively, you can use a spray bottle or a dedicated sanitizing bucket to apply the sanitizer directly to the surfaces.
Remember, cleaning and sanitizing are not interchangeable processes. Cleaning removes visible dirt and debris, while sanitizing kills any remaining microorganisms that could spoil your beer. By consistently following proper cleaning and sanitization procedures, you can minimize the risk of contamination and ensure a successful brew every time.
Common Brewing Mistakes and Troubleshooting
Homebrewing can be a rewarding experience, but it’s not without its challenges. Even experienced brewers can encounter issues during the brewing process. Here are some common mistakes and troubleshooting tips to help you identify and address brewing problems:
Off-Flavors: If your beer has an unpleasant taste or aroma, it could be due to various factors such as contamination, oxidation, or improper fermentation temperatures. Ensure proper sanitization, minimize oxygen exposure, and maintain the recommended fermentation temperature range for your yeast strain.
Stuck Fermentation: If your beer’s fermentation process stalls or stops prematurely, it could be due to factors like insufficient yeast health, high alcohol levels, or lack of nutrients. Try rousing the yeast by gently agitating the fermenter, adding yeast nutrient, or pitching fresh yeast.
Cloudy Beer: If your beer appears cloudy or hazy, it could be due to chill haze, yeast in suspension, or bacterial contamination. Try cold crashing, fining agents, or filtering to clarify your beer. If the cloudiness persists, it may be a sign of bacterial infection, and you should consider dumping the batch.
Gushing or Overcarbonation: If your beer gushes out of the bottle or becomes excessively carbonated, it could be due to over-priming, contamination, or improper bottling procedures. Check your priming sugar calculations, sanitize thoroughly, and ensure proper bottling techniques.
Undercarbonation: If your beer lacks carbonation, it could be due to insufficient priming sugar, improper bottling procedures, or a leak in the fermenter or bottles. Check your priming sugar calculations, ensure a proper seal, and consider adding a carbonation drop or force-carbonating.
Acetaldehyde: If your beer has a green apple or pumpkin-like aroma, it could be due to incomplete fermentation or improper yeast handling. Allow for a longer conditioning period, ensure proper fermentation temperatures, and consider adding a yeast nutrient.
Troubleshooting brewing issues often involves identifying the root cause and making adjustments to your process. Don’t be discouraged; even experienced brewers encounter problems from time to time. With patience, attention to detail, and a willingness to learn, you can overcome these challenges and continue to refine your homebrewing skills.
Aging and Conditioning
Aging and conditioning are crucial steps in the brewing process that can significantly impact the final quality and flavor of your beer. After the initial fermentation, the beer needs time to mature, allowing the flavors to develop and the byproducts of fermentation to settle out.
Proper aging and conditioning techniques can help eliminate off-flavors, clarify the beer, and create a smoother, more refined taste. The aging process typically takes place in a secondary fermentation vessel, such as a carboy or a keg, where the beer is left undisturbed for several weeks or even months, depending on the style and desired outcome.
One common technique for aging is dry hopping, which involves adding additional hops to the beer during the aging process. This can impart fresh hop aroma and flavor, enhancing the overall complexity of the beer.
Another essential aspect of conditioning is carbonation. Brewers can achieve carbonation through various methods, including force carbonation or natural carbonation. Force carbonation involves injecting carbon dioxide directly into the beer, while natural carbonation occurs when a small amount of priming sugar is added to the beer, allowing the remaining yeast to consume the sugar and produce carbon dioxide.
Proper temperature control is also crucial during the aging and conditioning process. Most beers benefit from being aged at cool temperatures, typically between 60-70°F (15-21°C). This slows down the aging process and helps prevent the formation of off-flavors.
Patience is key when it comes to aging and conditioning. While it can be tempting to bottle or keg your beer as soon as possible, allowing sufficient time for the aging and conditioning process can result in a significantly improved final product. Monitoring the beer’s progress and making adjustments as needed can help ensure a successful outcome.
Expanding Beyond Kits
As you gain experience and confidence in homebrewing, you may want to explore beyond the confines of pre-packaged kits. One of the natural progressions is to transition to all-grain brewing, which involves mashing grains yourself rather than relying on pre-made malt extracts. This method offers greater control over the brewing process and allows for more creative recipe formulation.
All-grain brewing requires additional equipment, such as a mash tun, hot liquor tank, and a larger boil kettle. However, the increased flexibility in ingredient selection and the ability to fine-tune the mash process can lead to more complex and nuanced flavors in your beer.
Recipe formulation is another area where you can unleash your creativity. Instead of following pre-designed recipes, you can experiment with different grain bills, hop varieties, and yeast strains to create unique and personalized brews. Software programs and online calculators can assist in designing recipes, calculating hop bitterness, and estimating alcohol content.
As you venture into recipe formulation, it’s essential to understand the roles of different ingredients and how they interact with each other. Malts contribute to the beer’s color, body, and fermentable sugars, while hops provide bitterness, aroma, and flavor. Yeast strains can also significantly impact the beer’s character, producing various esters and phenolic compounds.
Experimenting with different techniques, such as decoction mashing, step mashing, or using adjuncts like fruits, spices, or honey, can further expand your brewing horizons. Joining homebrewing clubs or attending workshops can provide valuable insights and guidance as you explore these advanced brewing methods.
Resources for Homebrewers
As you gain experience and confidence in homebrewing, you’ll likely want to explore additional resources beyond your starter kit. Here are some valuable resources to help you expand your knowledge and connect with the homebrewing community:
Books:
There are numerous excellent books available on homebrewing, covering everything from brewing techniques and recipes to brewing science and history. Some popular titles include “How to Brew” by John Palmer, “The Complete Joy of Homebrewing” by Charlie Papazian, and “Brewing Classic Styles” by Jamil Zainasheff and John J. Palmer.
Websites and Online Forums:
The internet is a treasure trove of information for homebrewers. Websites like Homebrewersassociation.org, BeerAdvocate.com, and Homebrewtalk.com offer extensive resources, including recipes, troubleshooting guides, and vibrant online communities where you can ask questions and share experiences with fellow brewers.
Local Homebrew Clubs:
Joining a local homebrew club can be an invaluable resource for learning and networking. These clubs often host meetings, tastings, and brewing sessions, allowing you to connect with experienced homebrewers in your area. Many clubs also organize group brew days, where members can collaborate and share their knowledge.
Homebrew Supply Shops:
In addition to providing equipment and ingredients, many homebrew supply shops offer classes, demonstrations, and advice from knowledgeable staff members. These shops can be excellent resources for troubleshooting issues, learning advanced techniques, and staying up-to-date with the latest trends and products in the homebrewing world.
Immersing yourself in these resources will not only help you improve your brewing skills but also introduce you to a vibrant community of passionate homebrewers who are eager to share their knowledge and experiences.