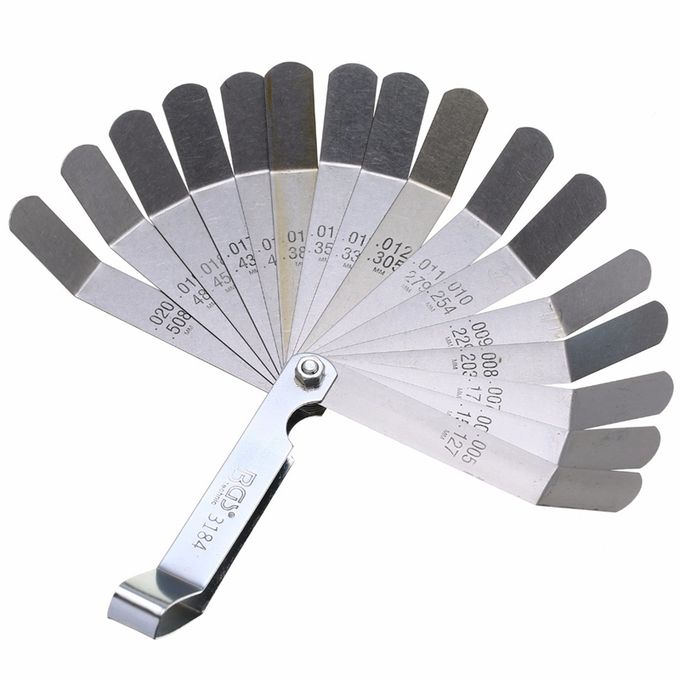
Feeler gauges, also known as feeler blades or thickness gauges, are thin strips of metal used to measure small gaps and distances. They consist of multiple thin blades stacked together, with each blade a slightly different thickness. The blades have precise measurements marked on them, such as metric or imperial units.
Feeler gauges have a wide range of uses in mechanical applications. They are commonly used to measure the clearance between two parts or the space between an object’s surface and a reference surface. Some common applications include:
- Measuring valve clearances in engines
- Setting spark plug gaps
- Adjusting tightness of fasteners and hardware
- Checking tolerances and alignments in machined parts
- Setting the gap in brake pads, clutches, and calipers
- Determining the taper on machine tool ways
- Checking for flatness or distortion in metal surfaces
The thin and flexible blades allow feeler gauges to slide into tight spaces that other measurement tools cannot access. They provide a quick and easy way to make precision measurements down to thousandths of an inch or hundredths of a millimeter. With various blade sizes stacked together, a single set of feeler gauges can measure a wide range of small gaps and spaces.
Table of Contents
Measuring Gap Clearances
Feeler gauges are commonly used to measure the gaps or clearances between two machined or manufactured parts. The thin blades of the feeler gauge can slide into tight spaces that calipers and micrometers cannot access. This allows precise measurement of the gap to ensure proper assembly and function.
One of the most common uses of feeler gauges is for setting spark plug gaps in internal combustion engines. The gap between the electrode and the spark plug body greatly affects engine performance. Feeler gauges with blade thickness markings allow the gap to be set to the manufacturer’s specifications, often between 0.6 mm to 1.3 mm. This ensures proper ignition and combustion.
Another common application is measuring valve clearances in the valve train of piston engines. Excessive clearance will cause valve recession and poor combustion. Too little clearance prevents full valve closure which reduces compression. Feeler gauges slide between the valve stem and rocker arm or camshaft to enable precise adjustment per the manufacturer’s recommendations, typically between 0.2 mm to 0.5 mm.
The ability to measure tiny gaps makes feeler gauges invaluable for engine tuning and preventative maintenance. Their flexible blades can access confined areas that other measurement tools cannot.
Measuring Surface Flatness
Feeler gauges are commonly used to check the flatness of surfaces in automotive repair, manufacturing, and machinery maintenance. This allows technicians to identify any warpage, bending, or uneven spots that could affect performance.
Checking Surface Flatness in Automotive Repair
When working on automotive engines, feeler gauges are inserted in between the cylinder head and engine block to check for flatness. Any gaps between the surfaces can cause head gasket failure or compression leaks. Technicians will measure across multiple points, looking for deviations that exceed manufacturer specifications. This helps identify any machining or warpage issues that require shimming or resurfacing before reassembly.
Measuring Warpage in Metal Parts
During manufacturing processes like welding, cutting, or machining, metal parts can develop warpage from stresses or heating. A feeler gauge provides a quick way to check parts for flatness deviations along the surface. Operators can run the gauges across plates, brackets, frames, or other components to verify they meet flatness tolerances before moving to the next production step.
Identifying Flat Spots in Machinery
Rotating machinery like lathes, mills, pumps, and motors rely on tight clearances between components. If wear, misalignment, or imbalance occurs, flat spots may develop on shafts, bearings, or other surfaces. Sweeping a feeler gauge across a component can help identify these flat areas so technicians know which parts may need replacement to restore optimal operation. This prevents further damage from imbalances or contact.
Thickness and Dimension Measurement
Feeler gauges are commonly used for quick thickness and dimension measurements in manufacturing and machining applications. They provide a fast and easy way to measure the thickness of sheet metal, wires, and other materials.
To measure thickness, simply insert the feeler gauge into the gap and determine which blade fits snugly without binding. The thickness of that blade indicates the measurement. This is much faster than using calipers or micrometers for every measurement.
Feeler gauges are also great for making quick dimensional checks. For example, you can quickly check the width of a slot or the distance between two surfaces. Just insert the blades and determine which one fits properly in the space.
In addition, feeler gauges are handy for comparing parts to specifications. You can check dimensions like surface flatness, hole size, slot width, etc against the prints to ensure they are within the allowed tolerances. Slipping blades into openings and gaps provides a fast go/no-go test.
Feeler gauges are especially useful on the shop floor where quick measurements are often needed. The thin blades can fit into tight spaces that other measurement tools cannot. This enables efficient thickness and dimension verification during manufacturing and assembly.
Aligning and Leveling Parts
Feeler gauges are commonly used when aligning and leveling parts in assemblies and fixtures. Proper alignment is critical for the performance and longevity of machinery.
When aligning machined components like bearings, shafts, and housings, feeler gauges help set the proper clearances and ensure parts are concentric and centered. During assembly, inserting feeler gauges of specific thicknesses between components enables precise control of alignments before tightening fasteners.
Feeler gauges are also useful for leveling parts and assemblies. Placing gauges under mounting feet or brackets allows for adjusting the heights until the assembly is level and stable. Using varying thickness gauges enables fine tuning adjustments during leveling.
In addition, feeler gauges enable setting clearances between stationary and moving components. Inserting a feeler gauge of the desired clearance gap and then adjusting parts until there is a slight drag allows clearances to be accurately set. Proper clearances are essential for smooth operation of machinery.
Overall, Feeler gauges are an indispensable tool for precision alignment and leveling of machinery components and assemblies during installation and set up. Their use helps ensure proper fit and clearances for optimal performance.
Material Thickness and Tolerance Checking
Feeler gauges are commonly used in manufacturing and machining to verify the thickness of sheet metal and other materials. They allow workers to quickly check that the material is within the specified tolerance compared to the engineering drawings.
To check thickness, the feeler gauges blade is inserted into any gap between two surfaces. If the blade fits between the surfaces without any clearance, then the material is at the minimum allowed thickness. If there is some wiggle room around the blade, then the material exceeds the minimum thickness.
Workers can also use feeler gauges to check machining tolerances on parts and components. The blades can be slid into slots, holes, gaps, and recesses to confirm they are within the allowed size variation from the engineering specs. Tighter tolerances require thinner gauge blades to detect any deviation.
Using a set of feeler gauges to regularly verify tolerances helps ensure the manufacturing process stays on target. Operators can catch any issues early before dimensions drift over time. Quick thickness and tolerance checks also reduce scrapped materials and parts that fail to meet the requirements. Feeler gauges provide a simple, inexpensive, and reliable way to compare physical parts to their intended engineering designs.
Feeler Gauge Materials and Sizes
Feeler gauges are available in a variety of materials and sizes to suit different applications and preferences. The most common materials are:
- Stainless steel – Durable and corrosion resistant but can wear down precision surfaces with repeated use. Provides good “feel” for measurements.
- Hardened steel – Very durable with excellent wear resistance. Can be used on precision surfaces without damage. Less flexible than stainless steel.
- Plastic/nylon – Non-marring and won’t damage surfaces. Flexible and inexpensive. Not as durable over time.
Standard feeler gauge sets are available in inch sizes, while metric sets use millimeters. Standard inch sizes come in blade thicknesses from 0.0015 inches to 0.035 inches, increasing in 0.001 inch increments. This provides a wide range for measuring small gap clearances.
Metric feeler gauge sizes start at 0.03 mm and go up to 0.5 mm, increasing in 0.01 mm increments. The smaller blade sizes allow for higher precision measurements.
Larger inch feeler gauges up to 0.125 inches are also available for applications like sheet metal bending where larger clearances are measured.
The range of material choices and blade sizes means technicians can select the right feeler gauge type and thickness for their specific measuring task and tolerance requirements. Precision instruments like feeler gauges require care and maintenance for longevity and accuracy.
Care and Maintenance
Proper care and maintenance is key to ensure feeler gauges provide accurate measurements over their lifetime. Here are some tips:
Proper Storage
When not in use, feeler gauges should be stored in a clean, dry, and protected area to prevent corrosion and damage. Avoid storing in damp environments or locations with wide temperature swings. Store gauges flat and avoid bending or creasing them. Consider using a storage case or sleeve.
Cleaning Methods
Clean feeler gauges regularly with a soft, lint-free cloth. Isopropyl alcohol can help remove built-up oils or grime. Avoid using solvents which could damage the metal. Use care when cleaning to avoid scratching the surfaces.
Avoiding Damage
Take care not to drop or bend feeler gauges. Dropping can deform or work-harden the metal, affecting accuracy. Avoid placing heavy objects on top of gauges. When using gauges, insert them carefully between surfaces to prevent tearing or creasing. Replace damaged or worn gauges instead of trying to repair them.
Alternatives and Limitations
While feeler gauges are versatile tools for measuring small gaps and clearances, they do have some limitations compared to other instruments. In some cases, digital or dial gauges may be more suitable.
Digital Gauges
Digital gauges can provide more precise measurements down to .001″ or .01mm. They display the measurement on an easy-to-read digital display. This makes them quicker and simpler to use compared to reading the gap by feel with traditional feeler gauges. Popular types include digital calipers, micrometers, and thickness gauges.
Dial Indicators
Dial indicators, also called dial gauges, use a small clock-like dial with a needle to provide precise measurements. The needle moves as contact is made with a surface. They can measure variances in height, runout, deflection, and other dimensions. Dial indicators are useful when more precision is needed than a feeler gauge can provide.
When Feeler Gauges Aren’t Suitable
While versatile, feeler gauges do have limitations. They generally only measure up to 1mm or .040 inches in thickness. For larger gaps, calipers or micrometers would be required. Feeler gauges rely on the sense of feel and human interpretation. So they are not well-suited for capturing highly precise measurements below .001″. Applications requiring digital output or data logging would require digital gauges. In general, feeler gauges are best suited for quick relative measurements rather than highly precise quantified values.
Conclusion
Feeler gauges are simple yet versatile tools used for a variety of important measurement applications. Their main uses include measuring gap clearances, surface flatness, material thickness, and part alignment.
The main advantages of feeler gauges are their affordability, durability, precision, and ease of use. They allow mechanics and machinists to quickly take measurements without cumbersome setups. The thin blades can fit into the smallest gaps and slots.
Feeler gauges are especially important for engine tuning and maintenance. Proper valve lash and spark plug gap measurements ensure efficient combustion and prevent premature wear. During assembly and fabrication, feeler gauges help mechanics align parts and verify tolerances precisely.
Overall, feeler gauges are indispensable tools that provide quick and accurate measurements for metalworking applications. Their flexibility and precision make them a vital instrument for any mechanic’s or machinist’s toolbox. With proper care, these simple gauges will provide years of reliable service.


