What is a Brake Spring Tool?
A brake spring tool is a specialized tool used in the automotive industry for servicing and maintaining brake systems. Its primary purpose is to assist mechanics in removing and installing brake springs, which are crucial components that help apply and release the brake shoes or pads.
Brake springs are small yet essential parts of the brake assembly. They provide the necessary tension to keep the brake shoes or pads in contact with the brake drum or rotor when the brakes are applied. Over time, these springs can weaken, corrode, or break, necessitating their replacement during brake service.
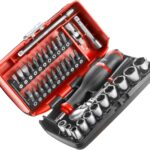
A typical brake spring tool consists of a sturdy handle, often made of metal or reinforced plastic, and a set of specialized tips or hooks designed to grip and manipulate the brake springs securely. These tips are shaped to fit the contours of different brake spring designs, allowing the tool to be used on a wide range of vehicle models.
Table of Contents
Types of Brake Spring Tools
Brake spring tools come in various styles and designs, each suited for different types of brakes and applications. Here are some of the most common types:
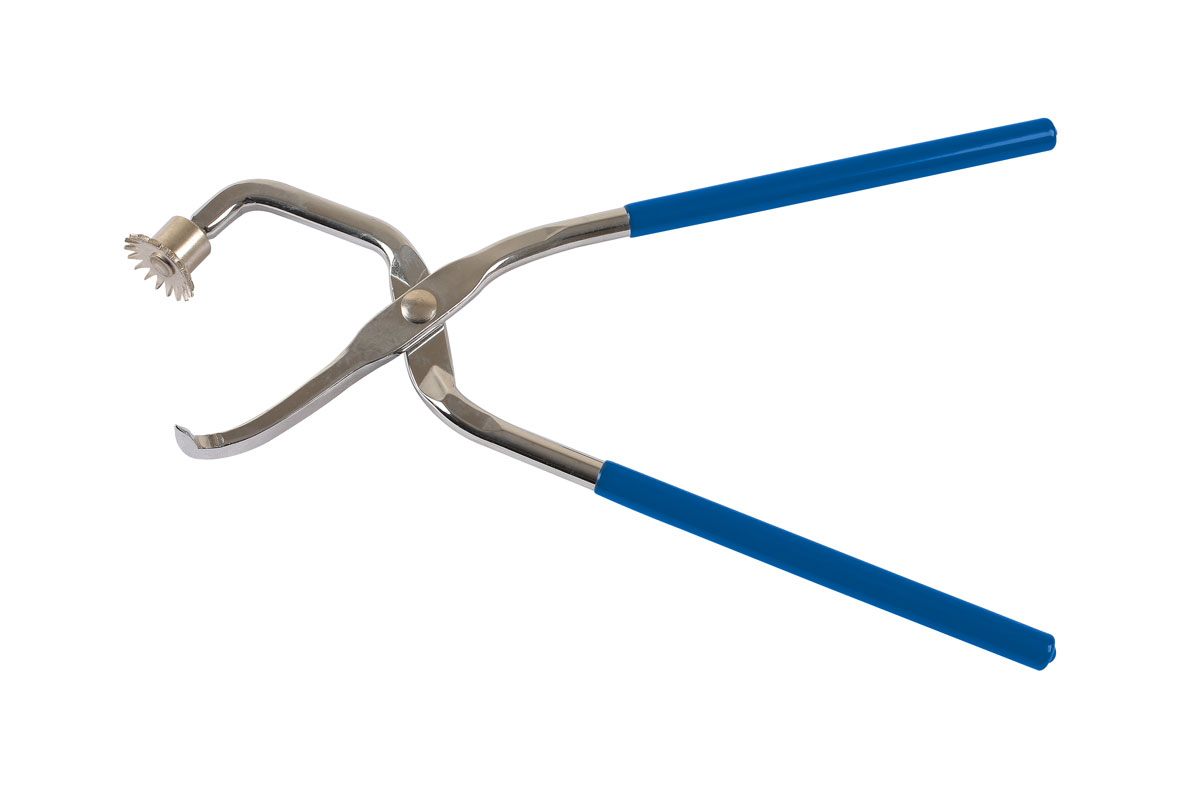
Plier-Style Brake Spring Tools
These tools resemble a pair of pliers with specially designed jaws or tips to grip and manipulate brake springs. They are versatile and can be used on various brake systems, making them a popular choice for both professionals and DIY enthusiasts.
Hook-Style Brake Spring Tools
Hook-style tools feature a hooked end designed to catch and remove brake springs. They are often used for drum brakes, where the springs can be challenging to access and remove with other tools.
Combination Brake Spring Tools
As the name suggests, these tools combine multiple functions into a single tool. They may have a plier-style design with additional hooks or tips for different brake spring applications, making them a versatile option for those working on various brake systems.
Drum Brake Spring Tools
These specialized tools are designed specifically for working with drum brake systems. They often feature unique shapes and configurations to access and manipulate the brake springs found in drum brakes.
Disc Brake Spring Tools
Designed for disc brake systems, these tools are engineered to handle the unique brake spring designs found in disc brakes. They may have narrow tips or hooks to reach and remove the springs in tight spaces.
Brake Caliper Spring Tools
These tools are tailored for working with the brake caliper springs found in disc brake systems. They often have specialized tips or jaws to grip and remove these small but essential components.
Remember, different brake systems may require specific tools or tool configurations, so it’s essential to choose the right tool for the job to ensure safe and efficient brake spring removal and installation.
When to Use a Brake Spring Tool
A brake spring tool is an essential piece of equipment when working on brake systems, particularly during brake pad replacement or caliper removal. These tools are designed to safely compress and release the brake caliper pistons, allowing for smooth and efficient brake service.
One of the most common situations where a brake spring tool is required is during brake pad replacement. When replacing worn-out brake pads, the caliper pistons need to be pushed back into their bores to create space for the new pads. Without a brake spring tool, this task can be challenging and may even damage the caliper or brake components.
Another scenario where a brake spring tool comes in handy is during caliper removal. Calipers often need to be removed for various reasons, such as replacing brake fluid, servicing the caliper itself, or inspecting the brake rotor. To remove the caliper safely and without damaging the brake system, the pistons must be retracted using a brake spring tool.
In addition to these common situations, a brake spring tool may also be required when performing brake system maintenance or repairs, such as replacing brake hoses, bleeding the brake system, or inspecting brake components for wear or damage.
Overall, a brake spring tool is an indispensable tool for anyone working on brake systems, whether it’s a professional mechanic or a DIY enthusiast. Its ability to safely compress and release caliper pistons ensures that brake service can be performed efficiently and without causing any damage to the brake components.
How to Use a Brake Spring Tool
Using a brake spring tool is a straightforward process, but it’s essential to follow the proper steps to ensure safety and effectiveness. Here’s a step-by-step guide on how to use a brake spring tool:
- Prepare the Work Area: Clear a clean and well-lit workspace to perform the task. Ensure that you have enough room to move around the vehicle and access the brake components comfortably.
- Gather Necessary Tools: In addition to the brake spring tool, you’ll need a few other tools, such as pliers, a brake caliper piston compressor tool, and a torque wrench. Having the right tools at hand will make the job easier and more efficient.
- Disengage the Parking Brake: Before starting any work on the brakes, ensure that the parking brake is disengaged. This will prevent any unnecessary tension on the brake components and make the process smoother.
- Remove the Brake Caliper: Carefully remove the brake caliper from the rotor, taking note of its position and any shims or spacers that may be present. Be cautious not to let the caliper hang by the brake line, as this can cause damage.
- Compress the Brake Caliper Piston: Using the brake caliper piston compressor tool, compress the piston back into the caliper housing. This will create space for the new brake pads and make it easier to remove and replace the brake springs.
- Locate the Brake Springs: Identify the brake springs that need to be replaced or adjusted. They are typically located on the caliper bracket or caliper housing, holding the brake pads in place.
- Use the Brake Spring Tool: Position the brake spring tool over the brake spring you want to remove or adjust. The tool is designed to grip the spring and provide leverage for removal or installation.
- Apply Pressure and Remove/Install the Spring: Gently apply pressure to the brake spring tool, following the manufacturer’s instructions. This will either remove the old spring or allow you to install the new one. Be careful not to overextend or damage the spring during this process.
- Repeat for Additional Springs: If your brake system has multiple springs, repeat the process for each one, ensuring that all springs are properly installed or replaced.
- Reinstall the Brake Components: Once the springs are in place, reverse the disassembly process by reinstalling the brake pads, caliper, and any other components you removed. Ensure that everything is properly aligned and secured.
- Bleed the Brake System: After reassembling the brake components, it’s essential to bleed the brake system to remove any air that may have entered during the process. Follow the manufacturer’s recommended procedure for bleeding the brakes.
- Test and Adjust: With the brakes reassembled, test the operation of the brakes and make any necessary adjustments to ensure proper function and performance.
Remember, safety should always be your top priority when working with brake components. If you’re unsure about any part of the process or encounter any difficulties, it’s best to consult a professional mechanic for assistance.
Safety Precautions
Working with brake spring tools can be dangerous if proper safety measures are not followed. These tools are designed to handle high-tension springs, and improper use can lead to injury or damage. Here are some crucial safety precautions to keep in mind:
- Wear protective eyewear at all times to prevent eye injuries from flying debris or spring components.
- Use thick, sturdy gloves to protect your hands from pinching or lacerations caused by the high-tension springs.
- Ensure the work area is clean and free from clutter, providing ample space to maneuver the tool safely.
- Follow the manufacturer’s instructions carefully, and never exceed the tool’s rated capacity or force limits.
- Double-check that the tool is securely attached and properly positioned before engaging the spring mechanism.
- Never attempt to override or disable any safety features on the tool.
- Keep bystanders, especially children, at a safe distance from the work area.
- Avoid distractions and maintain focus throughout the entire process.
- If the tool becomes stuck or jammed, do not force it; seek professional assistance if necessary.
Neglecting safety protocols when using brake spring tools can have severe consequences. Always prioritize your safety and the safety of those around you by adhering to these precautions and exercising caution at all times.
Choosing the Right Brake Spring Tool
Selecting the appropriate brake spring tool is crucial for ensuring a successful and safe brake repair or replacement job. Several factors should be considered when choosing the right tool for your needs:
Size and Compatibility: Brake spring tools come in various sizes to accommodate different vehicle makes and models. It’s essential to choose a tool that is compatible with your specific brake system. Consult your vehicle’s repair manual or consult with a professional mechanic to determine the correct size needed for your brakes.
Material and Durability: Brake spring tools are typically made from high-quality steel or other durable materials to withstand the pressure and force required during brake spring removal and installation. Look for tools constructed with sturdy materials that can withstand repeated use without bending or breaking.
Brand and Quality: While there are numerous brands offering brake spring tools, it’s advisable to invest in a reputable brand known for producing high-quality tools. Well-known brands often offer better quality control, durability, and customer support, ensuring a reliable and long-lasting tool.
Ergonomic Design: Consider tools with ergonomic handles or grips that provide a comfortable and secure grip, reducing hand fatigue and minimizing the risk of slippage during use. Ergonomically designed tools can also help you apply more force safely and efficiently.
Tool Set vs. Individual Tools: Depending on your needs, you may choose to purchase a complete brake tool set or individual tools. Brake tool sets often include various sizes and types of tools needed for different brake jobs, while individual tools allow you to build your toolkit gradually as needed.
Budget: Brake spring tools can vary in price, with higher-end tools generally being more expensive but offering better quality and durability. Consider your budget and strike a balance between cost and quality, ensuring you invest in a reliable tool that will serve you well over time.
By considering these factors, you can choose a brake spring tool that meets your specific requirements, ensuring a safe and efficient brake repair or replacement process.
Maintenance and Care
Proper maintenance and care are crucial for ensuring the longevity and optimal performance of your brake spring tool. Here are some essential tips to keep your tool in top condition:
Storage:
- Always store your brake spring tool in a dry, clean environment, away from moisture and extreme temperatures.
- If possible, keep the tool in its original case or a sturdy toolbox to protect it from dust and accidental damage.
- Avoid storing the tool in direct sunlight or near sources of heat, as this can cause the metal components to expand or warp over time.
Cleaning:
- After each use, thoroughly clean the brake spring tool to remove any dirt, grease, or debris that may have accumulated during the job.
- Use a soft-bristle brush or a clean rag to gently remove any residue from the tool’s surfaces and moving parts.
- Avoid using harsh chemicals or abrasive cleaners, as they can damage the tool’s finish or compromise its functionality.
Lubrication:
- Regularly lubricate the moving parts of your brake spring tool with a high-quality, rust-preventive lubricant.
- Follow the manufacturer’s recommendations for the type and amount of lubricant to use.
- Proper lubrication will ensure smooth operation and prevent premature wear and tear.
Inspection:
- Periodically inspect your brake spring tool for signs of wear, cracks, or damage.
- Check for any loose or missing components, and replace them immediately if necessary.
- If you notice any significant wear or damage, consider replacing the tool to ensure your safety and the tool’s effectiveness.
By following these maintenance and care guidelines, you can extend the lifespan of your brake spring tool and ensure that it remains a reliable and efficient tool for your automotive repair needs.
Common Problems and Troubleshooting
Using a brake spring tool can present a few common challenges and issues. Here are some typical problems and troubleshooting tips to help you overcome them:
Difficulty Removing or Installing the Brake Shoe Springs:
- Ensure you have the correct brake spring tool for the specific brake assembly you’re working on.
- Apply penetrating lubricant to the spring and pivot points to help loosen stuck components.
- Use the tool’s leverage correctly, following the manufacturer’s instructions.
- If the springs are severely rusted or corroded, you may need to replace them entirely.
Tool Slipping or Not Gripping Properly:
- Check that the tool’s jaws or tips are in good condition and not excessively worn or damaged.
- Adjust the tool’s tension or tightness as per the manufacturer’s guidelines.
- Clean the tool’s gripping surfaces to remove any dirt, grease, or debris that may be causing slippage.
Damaging or Breaking the Brake Shoe Springs:
- Use the correct technique and apply force gradually to avoid overstressing the springs.
- Inspect the springs for any existing cracks, corrosion, or weaknesses before attempting to remove or install them.
- Replace any damaged or questionable springs, as they may break during the process.
Improper Reinstallation or Adjustment:
- Carefully follow the vehicle manufacturer’s instructions for reinstalling and adjusting the brake components.
- Ensure that the brake shoes, springs, and other hardware are correctly positioned and secured.
- After reassembly, check and adjust the brake system as necessary to ensure proper operation.
Regular maintenance, proper tool selection, and careful technique can help prevent many common issues when using brake spring tools. If you encounter persistent problems or feel unsure about the process, it’s always best to consult a professional mechanic.
Professional vs. DIY Use
The choice between professional and DIY use of brake spring tools largely depends on the level of expertise, frequency of use, and the complexity of the job at hand. While DIY enthusiasts can certainly benefit from using brake spring tools for routine maintenance or simple repairs, professionals in the automotive industry rely on these tools for their daily work and more complex tasks.
Professionals
For professional mechanics, auto technicians, and those working in brake repair shops, brake spring tools are essential equipment. These tools are designed for heavy-duty use and can withstand frequent and prolonged usage. Professionals often invest in high-quality, durable brake spring tools that can handle a wide range of vehicles and brake systems. They also have access to specialized tools and equipment that may not be readily available to DIYers.
Pros:
- Extensive training and experience in using brake spring tools safely and effectively
- Access to specialized tools and equipment for complex jobs
- Familiarity with various brake systems and vehicle models
- Ability to diagnose and repair issues quickly and efficiently
Cons:
- Higher initial investment in professional-grade tools and equipment
- Ongoing training and certification may be required
DIYers
For DIY enthusiasts and home mechanics, brake spring tools can be valuable additions to their toolbox, allowing them to perform basic maintenance and repairs on their vehicles. However, it’s important to note that DIY use of brake spring tools may have limitations and risks if not approached with caution and proper knowledge.
Pros:
- Cost-effective solution for simple repairs and maintenance
- Ability to perform basic tasks without relying on professional services
- Satisfaction of doing the work themselves
Cons:
- Lack of formal training and experience in using brake spring tools
- Limited access to specialized tools and equipment for complex jobs
- Increased risk of injury or damage if not used properly
- Potential for missed issues or incomplete repairs due to limited knowledge
Ultimately, the decision to use brake spring tools professionally or as a DIYer depends on factors such as skill level, the complexity of the job, and the level of risk one is willing to take. Professionals have the advantage of extensive training and experience, while DIYers may find brake spring tools useful for basic tasks but should exercise caution and seek professional assistance when necessary.
Brake Spring Tool Alternatives
While brake spring tools are designed specifically for removing and installing brake springs, there are a few alternative tools or methods that can be used in certain situations:
Pliers and Screwdrivers: For smaller brake spring jobs, a pair of needle-nose pliers or sturdy screwdrivers can sometimes be used to carefully pry and manipulate the springs. However, this approach is more difficult and risks damaging the springs or other components.
Brake Spring Pliers: Similar in function to brake spring tools, brake spring pliers are specialized pliers with hooked ends that can grip and compress brake springs. They offer more precision than standard pliers but may not work for all brake spring sizes or types.
Brake Caliper Wind-Back Tools: These tools are designed to rotate the caliper piston back into the caliper housing, which can sometimes aid in accessing and removing brake springs. However, they don’t directly remove or install the springs themselves.
Improvised Tools: In a pinch, some mechanics may attempt to fashion improvised tools from materials like bent coat hangers or sturdy wire to manipulate brake springs. This approach requires extreme care and skill to avoid damaging components.
Professional Service: For those uncomfortable working with brake springs or lacking the proper tools, seeking professional brake service from a qualified mechanic is always an option. Professionals have the specialized tools and expertise to safely and efficiently handle brake spring replacement.
While alternatives exist, dedicated brake spring tools remain the recommended option for most brake spring jobs due to their specialized design and ease of use. Attempting to use improper tools or methods can increase the risk of damaging brake components or compromising safety.
Frequently Asked Questions
What is a brake spring tool used for?
A brake spring tool is a specialized tool designed to assist in the removal and installation of brake springs on drum brakes. These springs hold the brake shoes in place and apply tension to ensure proper braking. Without a brake spring tool, it can be challenging and potentially dangerous to remove or install these springs due to their high tension.
Is a brake spring tool necessary for DIY brake jobs?
While it is possible to perform some brake jobs without a brake spring tool, it is highly recommended to use one, especially for drum brakes. Attempting to remove or install brake springs without the proper tool can lead to injury or damage to the brake components. A brake spring tool ensures a safe and efficient process.
Can I use the same brake spring tool for different vehicle makes and models?
Most brake spring tools are designed to be universal and can be used on various vehicle makes and models. However, it is essential to check the compatibility of the tool with your specific vehicle’s brake system. Some specialized tools may be required for certain brake designs or configurations.
How do I know if my brake spring tool is the correct size?
Brake spring tools typically come in different sizes to accommodate various brake spring diameters. Consult your vehicle’s service manual or check with the tool manufacturer to ensure you have the correct size for your brake system. Using the wrong size tool can damage the brake components or make the job more difficult.
Can a brake spring tool be used for other purposes?
Brake spring tools are designed specifically for working with brake springs and should not be used for other purposes. Using them for tasks they were not intended for can damage the tool or cause injury. It is best to use the correct tool for the job at hand.
How often should I replace my brake spring tool?
Brake spring tools are generally durable and long-lasting if properly maintained and used correctly. However, if you notice any signs of wear, such as cracks, bends, or deformities, it is recommended to replace the tool to ensure safe and effective operation.