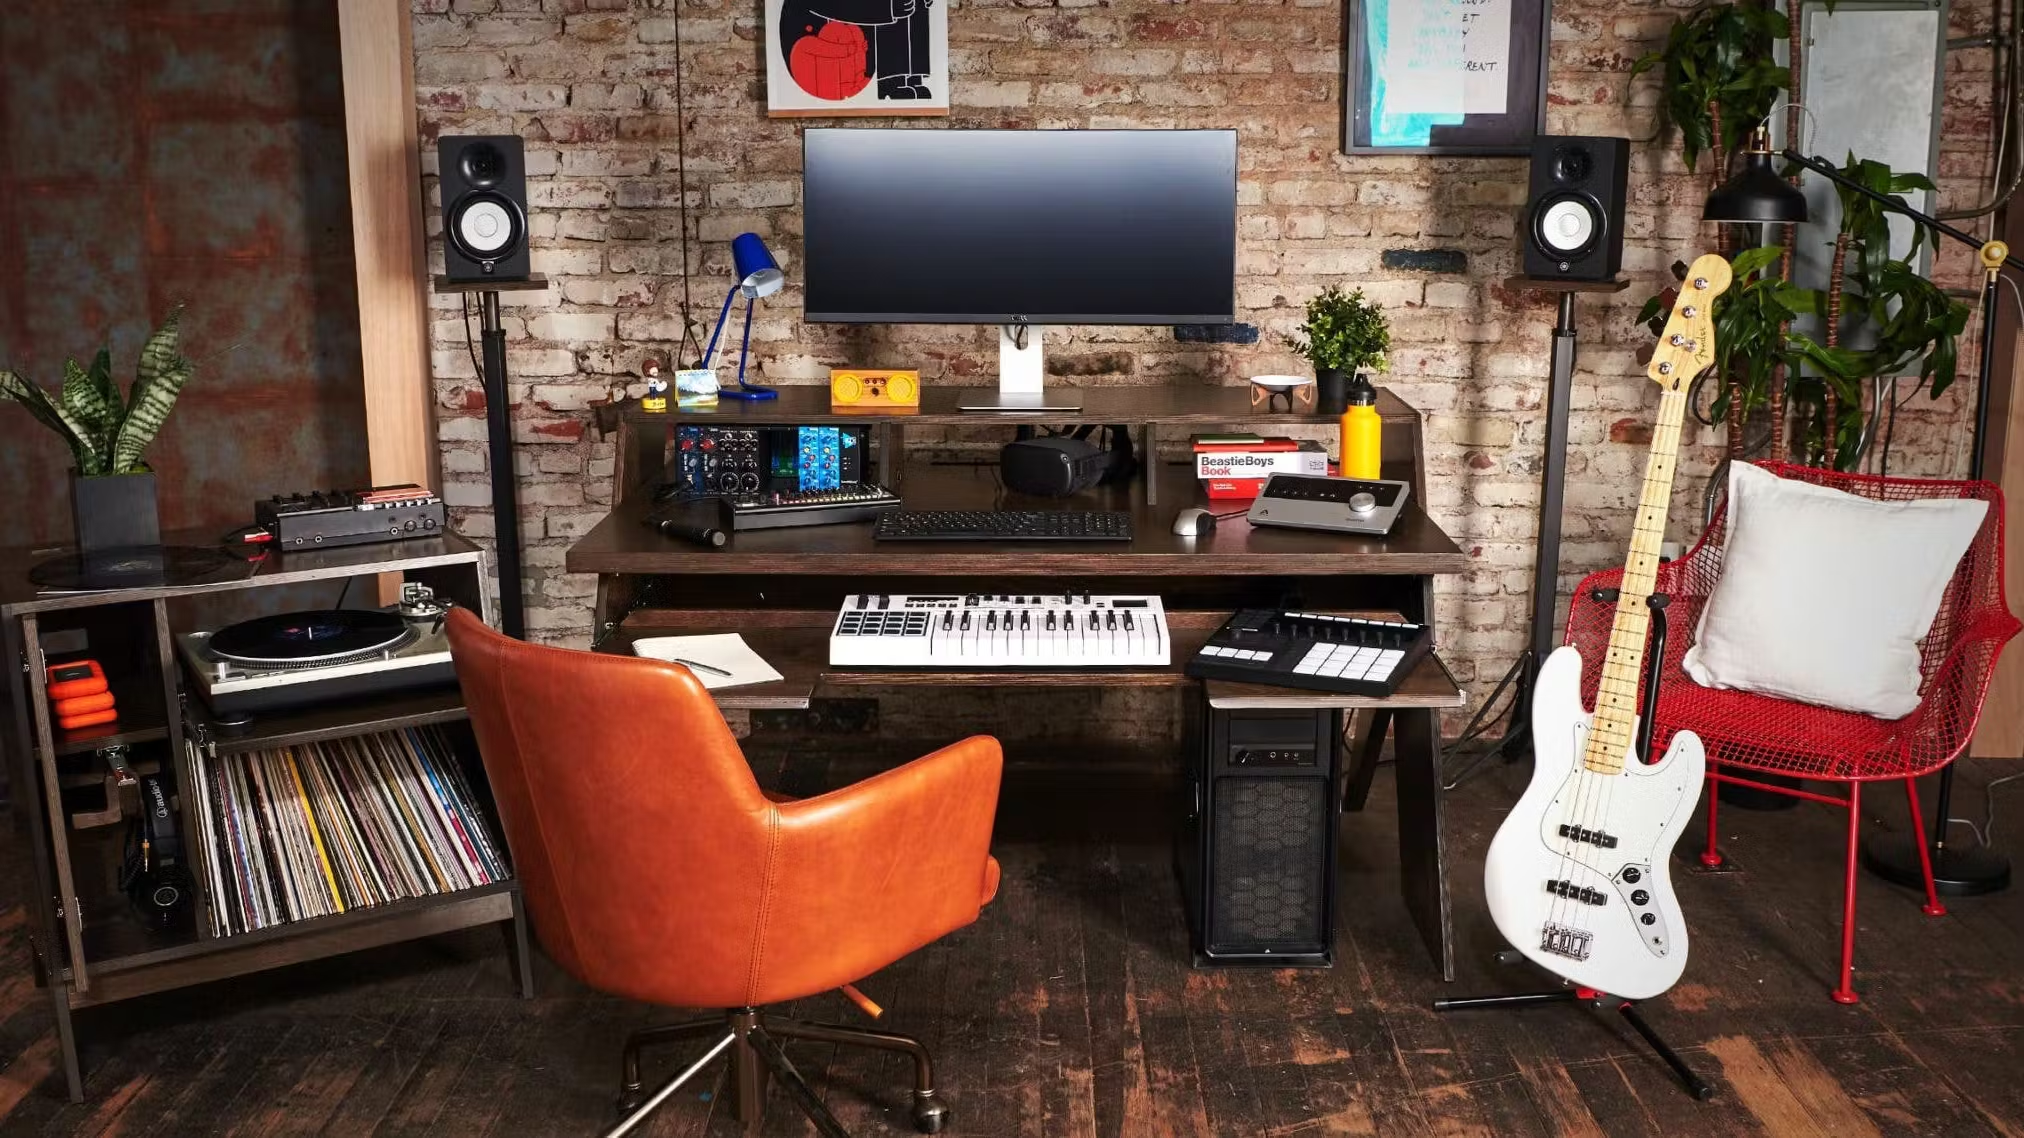
Introduction to Home Studios
A home studio is a compact and versatile music production setup designed for recording, mixing, and mastering audio within the comfort of your home or personal space. With the advancements in digital technology and the availability of affordable equipment, creating a professional-quality home studio has become more accessible than ever before.
The primary benefit of having a home studio is the ability to work on your music projects at your own pace and convenience, without the constraints of booking time at a commercial studio. This freedom allows you to experiment, refine your craft, and unleash your creativity without any external pressures or time limitations.
Setting up a home studio requires a combination of essential tools, including an audio interface, microphones, monitors or headphones, a digital audio workstation (DAW), and potentially MIDI controllers or virtual instruments. While the specific equipment may vary depending on your needs and budget, the goal is to create an environment that facilitates seamless audio recording, editing, and mixing.
Table of Contents
Audio Interfaces
An audio interface is a crucial component of any home studio setup, serving as the bridge between your instruments, microphones, and computer. Its primary function is to convert analog audio signals from your instruments or microphones into digital data that can be recorded and processed on your computer. Conversely, it also converts digital audio from your computer into analog signals that can be sent to your studio monitors or headphones for playback.
When choosing an audio interface, there are several factors to consider:
- Inputs and Outputs: Determine the number of inputs and outputs you’ll need based on the instruments and microphones you plan to record simultaneously. Most interfaces offer a combination of XLR inputs for microphones and 1/4-inch inputs for instruments or line-level sources.
- Compatibility: Ensure that the audio interface is compatible with your computer’s operating system and the digital audio workstation (DAW) you plan to use. Many interfaces are designed to work seamlessly with popular DAWs like Pro Tools, Logic Pro, Ableton Live, and more.
- Sound Quality: The quality of the preamps and converters used in an audio interface can significantly impact the overall sound quality of your recordings. Higher-end interfaces typically offer better preamps, converters, and signal-to-noise ratios, resulting in cleaner and more accurate audio capture.
- Connectivity: Consider the type of connectivity options offered by the audio interface, such as USB, Thunderbolt, or FireWire. Faster connections can provide lower latency and better performance, especially when working with large projects or multiple tracks.
- Additional Features: Some audio interfaces may offer additional features like MIDI input/output, direct monitoring capabilities, built-in DSP processing, or onboard mixing capabilities, which can enhance your workflow and provide more control over your recordings.
When selecting an audio interface, it’s essential to strike a balance between your current needs and future expansion plans. While entry-level interfaces can be a cost-effective starting point, investing in a more capable interface from the outset can future-proof your setup and accommodate your growing requirements as your home studio evolves.
Microphones
Microphones are the heart of any recording setup, converting sound waves into electrical signals that can be recorded and processed. There are several types of microphones, each with its own strengths and ideal applications.
Condenser Microphones: These microphones are highly sensitive and accurate, making them ideal for capturing delicate sounds like vocals, acoustic instruments, and orchestral recordings. Condenser mics require phantom power (typically provided by an audio interface) to operate. They come in different polar patterns, including cardioid (ideal for vocals), omnidirectional (for capturing sound from all directions), and figure-8 (for recording two sources simultaneously).
Dynamic Microphones: Known for their ruggedness and ability to handle high sound pressure levels, dynamic mics are often used for live performances and recording loud sources like drums and amplified instruments. They don’t require phantom power and are less susceptible to handling noise. Common polar patterns for dynamic mics include cardioid and supercardioid.
Ribbon Microphones: These vintage-style mics have a warm, natural sound and are particularly well-suited for recording instruments like guitars, brass, and percussion. Ribbon mics are fragile and sensitive to high sound pressure levels, making them less suitable for louder sources.
When choosing a microphone, consider factors like polar pattern (cardioid for isolating a single source, omnidirectional for capturing ambiance), frequency response (ensuring it can accurately capture the desired frequency range), and sensitivity (how well it picks up quiet or loud sources). Additionally, think about the microphone’s intended use – a large-diaphragm condenser might be perfect for vocals, while a dynamic mic could be better for recording drums or guitar amps.
Monitors and Headphones
Accurate monitoring is crucial in a home studio environment as it allows you to hear your recordings and mixes precisely as they are, without any coloration or alteration. This ensures that the final product sounds as intended on other playback systems. There are two main types of monitoring solutions for home studios: studio monitors and headphones.
Studio Monitors
Studio monitors are specialized speakers designed to provide a flat, uncolored frequency response, allowing you to hear the true representation of your audio. They come in various sizes and configurations, such as nearfield monitors (for close-up listening) and midfield monitors (for a bit more distance). When choosing studio monitors, consider factors like:
- Frequency response: Look for monitors with a wide and flat frequency response, typically ranging from around 40Hz to 20kHz.
- Power and amplification: Sufficient power is necessary to achieve accurate and distortion-free monitoring, especially at higher volumes.
- Driver size and configuration: Larger woofers (usually 5″ to 8″) provide better low-end response, while smaller drivers (often paired with a tweeter) offer improved high-frequency clarity.
- Room acoustics: The size and acoustic treatment of your room will influence the ideal monitor size and placement.
Headphones
While not a replacement for studio monitors, headphones are an essential tool for home studios, particularly when working late at night or in untreated rooms. They provide an isolated listening environment and can reveal details that might be masked by room acoustics. When selecting headphones, consider:
- Frequency response: Look for headphones with a flat, neutral frequency response across the entire audible spectrum.
- Open or closed-back design: Open-back headphones provide a more natural, spacious sound but leak sound, while closed-back designs offer better isolation but can sound more confined.
- Comfort and fit: Since you’ll be wearing them for extended periods, ensure a comfortable and secure fit.
- Impedance and amplification: Some headphones require dedicated amplification for optimal performance, especially high-impedance models.
Remember, while monitors and headphones serve different purposes, using both in tandem can provide a well-rounded monitoring solution for your home studio.
Digital Audio Workstations (DAWs)
A Digital Audio Workstation (DAW) is the heart of any modern home studio setup. It’s a software application that allows you to record, edit, mix, and produce audio on your computer. DAWs provide a virtual environment for creating, arranging, and manipulating digital audio tracks, complete with a range of tools and features to facilitate the music production process.
Popular DAW software options include:
- Pro Tools: Widely used in professional studios, Pro Tools is a powerful and comprehensive DAW known for its robust audio editing capabilities and seamless integration with industry-standard hardware.
- Logic Pro: Developed by Apple, Logic Pro is a feature-rich DAW that offers a user-friendly interface, extensive sound libraries, and advanced MIDI sequencing capabilities, making it a favorite among musicians and producers.
- Ableton Live: Renowned for its intuitive workflow and exceptional performance capabilities, Ableton Live is a go-to choice for live performers, DJs, and electronic music producers.
- FL Studio: Originally designed for creating beats and loops, FL Studio has evolved into a versatile DAW that caters to a wide range of genres, with a unique pattern-based workflow and a vast collection of virtual instruments and effects.
- GarageBand: Developed by Apple, GarageBand is a user-friendly and accessible DAW that comes pre-installed on Mac computers, making it an excellent choice for beginners and those on a budget.
When choosing a DAW for your home studio, consider the following features:
- Plugins and Virtual Instruments: Look for a DAW that supports a wide range of third-party plugins and virtual instruments, allowing you to expand your sonic palette and creative possibilities.
- MIDI Support: Ensure that the DAW offers robust MIDI capabilities, enabling seamless integration with hardware controllers, synthesizers, and other MIDI devices.
- Compatibility: Check if the DAW is compatible with your operating system, audio interface, and any other hardware or software you plan to use in your studio setup.
- Workflow and User Interface: Evaluate the DAW’s workflow and user interface to find one that aligns with your preferred way of working and feels intuitive to navigate.
- Automation and Editing Tools: Consider the DAW’s automation features, editing tools, and overall functionality to ensure it meets your specific production needs and workflow requirements.
Remember, while some DAWs may excel in certain areas, there is no one-size-fits-all solution. It’s essential to explore different options, try out demos, and ultimately choose the DAW that best suits your creative process, genre, and personal preferences.
MIDI Controllers and Instruments
MIDI (Musical Instrument Digital Interface) is a protocol that allows electronic musical instruments, computers, and other hardware to communicate and share data. MIDI does not transmit audio signals; instead, it sends instructions for playing, recording, and editing music.
MIDI controllers are hardware devices that generate MIDI data based on user input. They come in various forms, including:
Keyboard Controllers: These resemble traditional piano keyboards but lack built-in sound generation capabilities. They are used to play virtual instruments or control external sound modules.
Drum Pads: These controllers feature pads that can be struck or pressed to trigger drum sounds or other percussive elements within a virtual instrument or DAW.
Control Surfaces: These devices provide knobs, faders, and buttons for controlling various parameters within a DAW, such as mixing, automation, and transport controls.
Virtual instruments are software-based synthesizers, samplers, and sound modules that can be played using MIDI data from a controller or sequenced within a DAW. They offer a vast range of sounds, from realistic instrument emulations to fully synthesized and experimental tones.
Integrating MIDI controllers and virtual instruments with a DAW (Digital Audio Workstation) is a straightforward process. Most DAWs support MIDI input and output, allowing you to connect your MIDI controller and play virtual instruments directly within the software. Additionally, you can record MIDI performances, edit MIDI data, and take advantage of features like MIDI mapping and controller assignment for a more personalized workflow.
Studio Acoustics and Soundproofing
Proper studio acoustics and soundproofing are crucial for achieving high-quality recordings and mixes in a home studio environment. Acoustics refers to the way sound behaves and interacts with the room, while soundproofing involves minimizing the transmission of sound between the studio and the outside world.
The importance of acoustics lies in controlling the reflections and reverberations within the room. Untreated rooms can lead to standing waves, flutter echoes, and other acoustic issues that can negatively impact the accuracy of your monitoring and the overall sound quality. Acoustic treatment involves using various materials and techniques to absorb, diffuse, or redirect sound waves, creating a more balanced and controlled acoustic environment.
One of the most common acoustic treatment options is bass traps. Bass traps are designed to absorb low-frequency sound waves, which can be particularly problematic in small rooms. They are typically placed in the corners of the room, where low-frequency standing waves tend to accumulate. Bass traps can be made from various materials, such as rigid fiberglass or mineral wool, and are often covered with a breathable fabric.
Diffusers are another important acoustic treatment tool. They are designed to scatter sound waves in various directions, reducing the buildup of reflections and improving the overall sound diffusion within the room. Diffusers can be made from various materials, including wood or specialized diffuser panels, and can be placed on walls or ceilings.
Soundproofing techniques are essential for preventing sound from entering or escaping the home studio. This is particularly important if you live in an apartment or a shared living space, where noise can be a major issue. Soundproofing can be achieved through various methods, such as adding mass-loaded vinyl (MLV) or other dense materials to walls and ceilings, using acoustic sealants to fill gaps and cracks, and installing specialized soundproofing doors or windows.
In addition to these dedicated acoustic treatment and soundproofing solutions, you can also employ simple DIY techniques to improve the acoustic environment in your home studio. For example, hanging heavy curtains or blankets can help absorb reflections, while strategically placing bookshelves or other furniture can help diffuse sound waves.
Remember, achieving optimal acoustics and soundproofing in a home studio can be a complex process, and it may be beneficial to consult with an acoustic engineer or professional for guidance and recommendations specific to your space and needs.
Cables and Connectors
Cables are the unsung heroes of any home studio setup, acting as the vital links that connect various components and ensure seamless signal transmission. In the realm of audio production, understanding the different types of cables and their corresponding connectors is crucial for achieving optimal performance and minimizing signal degradation.
One of the most common cable types found in home studios is the XLR cable. These robust cables are designed for balanced audio signals and are widely used to connect microphones, audio interfaces, and other professional-grade equipment. XLR cables feature a three-pin connector that provides excellent shielding against electromagnetic interference, ensuring a clean and noise-free signal transfer.
Another essential cable type is the TRS (Tip-Ring-Sleeve) cable, also known as a 1/4-inch cable. These cables are commonly used for unbalanced audio connections, such as connecting guitars, keyboards, or other line-level devices to audio interfaces or amplifiers. TRS cables come in various lengths and can be used for both mono and stereo applications, making them versatile tools in any home studio.
MIDI cables, while not carrying audio signals, are indispensable for connecting MIDI controllers, synthesizers, and other MIDI-enabled devices. These cables transmit digital data, allowing seamless communication between various MIDI devices and your digital audio workstation (DAW).
Effective cable management is equally important in a home studio environment. Properly organizing and routing cables not only enhances the overall aesthetics but also minimizes the risk of signal interference and ensures a clutter-free workspace. Cable ties, cable sleeves, and cable raceways are invaluable tools for keeping your cables organized and tidy.
In addition to cables, understanding connectors and adapters is crucial for ensuring compatibility between different pieces of equipment. Common connectors include 1/4-inch TS (Tip-Sleeve) connectors for unbalanced mono signals, RCA connectors for consumer-grade audio equipment, and USB connectors for connecting digital interfaces and peripherals. Adapters, such as XLR-to-1/4-inch or 1/4-inch-to-RCA, can bridge the gap between incompatible connectors, allowing for seamless integration of various devices.
By mastering the art of cable and connector management, you can create a streamlined and efficient home studio setup, ensuring optimal signal quality and minimizing potential issues caused by tangled or poorly connected cables.
Accessories and Add-ons
While the core components of a home studio, such as an audio interface, microphone, and DAW software, are essential, there are numerous accessories and add-ons that can enhance your recording experience and improve the overall quality of your projects. These additional tools can help you achieve better sound quality, increase your productivity, and provide greater convenience and flexibility.
One of the most useful accessories is a pop filter, which helps to reduce plosive sounds (hard ‘p’ and ‘b’ sounds) that can cause unwanted spikes in the audio signal. Pop filters are typically placed in front of the microphone, creating a physical barrier that disperses the air from plosive sounds before it reaches the microphone capsule. This results in cleaner and more professional-sounding vocal recordings.
Microphone stands and boom arms are also essential accessories for any home studio. A sturdy microphone stand ensures that your microphone remains in the optimal position during recording sessions, while a boom arm allows you to easily adjust the microphone’s placement and angle. This flexibility can be particularly useful when recording multiple sources or when working with different vocalists or instrumentalists.
Headphone amplifiers can be a valuable addition to your home studio, especially if you plan on recording with multiple performers simultaneously. These devices provide dedicated amplification for headphones, ensuring that each performer can clearly hear their own mix without interference from other sources. Headphone amplifiers also offer greater control over the headphone volume and can improve the overall quality of the headphone monitoring experience.
In addition to hardware accessories, there are numerous software add-ons and plugins that can enhance your DAW’s capabilities. Virtual instrument plugins, for example, can provide a wide range of high-quality synthesizers, drum machines, and samplers, allowing you to create rich and diverse musical arrangements without the need for physical instruments. Similarly, effect plugins, such as reverb, delay, and compression, can help you shape and refine your sound, giving your recordings a professional polish.
Finally, consider investing in additional storage solutions, such as external hard drives or cloud storage services, to ensure that your projects and recordings are safely backed up and easily accessible. Losing valuable work due to a hard drive failure or other technical issues can be devastating, so implementing a reliable backup strategy is crucial.
By incorporating these accessories and add-ons into your home studio setup, you can unlock new creative possibilities, streamline your workflow, and produce professional-quality recordings that rival those from dedicated commercial studios.
Setting Up and Optimizing Your Home Studio
Proper setup and optimization are crucial for maximizing the potential of your home studio. Here are some tips to help you create an efficient and organized workspace:
Room Setup and Acoustics
- Choose the right room: Select a room with minimal external noise and adequate space for your equipment. Basements, spare bedrooms, or converted garages can work well.
- Acoustic treatment: Treat your room with sound-absorbing materials like acoustic panels, bass traps, and diffusers to control reflections and improve audio quality.
- Speaker placement: Position your monitors at ear level and form an equilateral triangle with your listening position for optimal stereo imaging.
Ergonomics and Workflow
- Comfortable workstation: Invest in an ergonomic chair and desk to minimize fatigue during long sessions.
- Efficient cable management: Use cable ties, raceways, and cable sleeves to keep your workspace tidy and organized.
- Dual monitor setup: Consider using two monitors to streamline your workflow by separating your DAW and reference materials.
- Customizable templates: Create custom templates in your DAW for various project types to save time and maintain consistency.
- Backup and storage solutions: Implement a reliable backup system, such as external hard drives or cloud storage, to safeguard your work.
Equipment Placement and Connectivity
- Logical equipment layout: Arrange your gear in a logical and accessible manner, considering cable lengths and signal flow.
- Proper grounding and power conditioning: Use power conditioners and properly ground your equipment to eliminate noise and interference.
- Modular and expandable setup: Plan for future upgrades by leaving room for additional gear and using modular components when possible.
- Consistent patching: Establish a consistent patching system for your inputs and outputs to streamline your workflow and minimize confusion.
By following these tips, you can create a well-organized, ergonomic, and acoustically optimized home studio that fosters creativity and productivity.
Budgeting and Cost Considerations
Building a home studio can be an exciting endeavor, but it’s crucial to approach it with a well-planned budget. While quality equipment is essential for achieving professional-grade results, it’s possible to create an impressive setup without breaking the bank. The key is striking the right balance between investing in essential tools and finding cost-effective solutions.
One strategy for building a home studio on a budget is to prioritize your purchases. Start with the core components, such as an audio interface, a decent microphone, and a reliable DAW. These items are the foundation of your setup, and investing in quality here will pay dividends in the long run. As your skills and projects evolve, you can gradually upgrade or expand your equipment.
Another cost-saving approach is to explore the used or refurbished market. Many reputable online marketplaces and local music stores offer pre-owned gear at discounted prices. With proper research and due diligence, you can often find high-quality equipment that has been well-maintained and still has plenty of life left.
It’s also worth considering building your home studio incrementally. Rather than attempting to acquire everything at once, spread out your purchases over time. This approach not only makes the financial burden more manageable but also allows you to familiarize yourself with each new piece of equipment before moving on to the next.
When it comes to accessories and add-ons, look for budget-friendly alternatives that still deliver decent performance. For instance, instead of investing in expensive studio monitors right away, you could start with a pair of quality headphones or affordable desktop speakers. As your skills and budget grow, you can upgrade to more advanced monitoring solutions.
Remember, the key to building a successful home studio is not necessarily about having the most expensive gear but rather about understanding how to use the tools you have effectively. With careful planning, patience, and a willingness to learn, you can create a professional-quality setup that meets your needs without breaking the bank.
Maintenance and Troubleshooting
Maintaining your home studio equipment is crucial for ensuring optimal performance and longevity. Regular maintenance can help prevent issues from arising and catch potential problems early on. It’s important to follow the manufacturer’s recommendations for cleaning, calibrating, and servicing your gear.
Common issues that may arise in a home studio include audio interface connectivity problems, microphone malfunctions, software crashes, and acoustic issues. Troubleshooting these problems can often be done by checking connections, updating drivers and software, and making adjustments to your studio setup.
One of the most common issues is audio interface connectivity problems. If you’re experiencing dropouts, crackling, or no sound at all, start by checking your cables and connections. Ensure that everything is securely plugged in and that your drivers are up to date. If the issue persists, try a different USB port or cable.
Microphone malfunctions can be frustrating, but there are a few things you can try. First, check the connections and cables. If everything seems to be connected properly, try a different microphone or preamp to isolate the issue. Sometimes, phantom power or gain settings need to be adjusted.
Software crashes can be caused by a variety of factors, including outdated software, conflicts with other programs, or hardware issues. Always keep your DAW and plugins up to date, and try disabling any unnecessary programs or plugins to see if that resolves the issue.
Acoustic issues, such as unwanted reflections or room modes, can be addressed by adjusting your studio setup and adding acoustic treatment. Experimenting with speaker and microphone placement, as well as using bass traps and diffusers, can help improve the sound quality in your space.
If you’re unable to resolve an issue on your own, don’t hesitate to seek support from the manufacturer or online communities. Many companies offer customer support, and there are numerous forums and resources available where you can find troubleshooting tips and advice from experienced users.
Conclusion and Final Thoughts
Setting up a home studio can be an exciting and rewarding journey, but it requires careful planning and the right tools. Throughout this guide, we’ve explored various essential components, from audio interfaces and microphones to DAWs and studio acoustics, each playing a crucial role in shaping your recording experience.
Remember, there’s no one-size-fits-all solution when it comes to home studio setups. The key is to find the tools that align with your specific needs, budget, and creative goals. Whether you’re a musician, podcaster, or content creator, the right equipment can help you unleash your full potential and bring your artistic vision to life.
As you embark on this journey, keep an open mind and embrace the continuous learning process. The world of audio production is ever-evolving, with new technologies and techniques emerging regularly. Stay curious, experiment, and don’t be afraid to step out of your comfort zone – that’s where true growth and innovation often occur.
Building a home studio is not just about acquiring gear; it’s about creating a space that fosters creativity, inspiration, and personal expression. Take the time to optimize your setup, whether it’s through acoustic treatment or ergonomic considerations, to ensure a comfortable and productive working environment.
In the end, remember that the tools are merely a means to an end. What truly matters is the passion, dedication, and creativity you bring to your craft. With the right mindset and a willingness to learn, you can transform your home studio into a powerhouse of artistic expression, allowing you to share your unique voice with the world.