
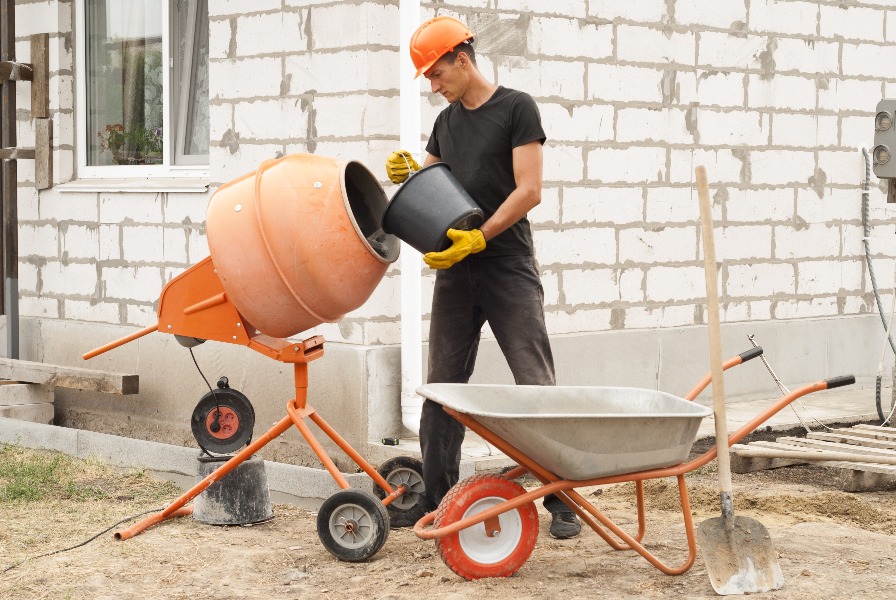
A cement mixer is a critical piece of equipment for construction projects that require concrete. It is used to thoroughly mix cement, sand, gravel, water, and other ingredients to form concrete.
Concrete is a composite building material made from these ingredients. It has high compressive strength and durability, making it ideal for foundations, walls, floors, bridges, roads, dams, and more in the construction industry.
Cement acts as the binder to hold the sand and gravel together when mixed with water. A cement mixer allows these materials to be blended homogeneously for quality concrete production.
The rotating drum of the cement mixer keeps the concrete mixture in motion while mixing, which prevents the ingredients from separating. This consistent mixing action is essential for proper bonding and curing of the concrete.
Cement mixers come in different sizes for small or large concrete batches. They are commonly found at construction sites and are also available for rent or purchase. With a cement mixer, concrete can be mixed on-site and poured directly wherever needed.
Learning how to properly operate a cement mixer is an important skill for anyone working with concrete. We’ll cover the basic steps involved in using this indispensable equipment.
Table of Contents
Step 1: Safety first
Operating a cement mixer can be dangerous if proper precautions are not taken. Here are some tips for staying safe:
- Wear protective gear. This includes goggles to protect your eyes from debris, sturdy gloves to protect your hands from abrasions, and steel-toe boots in case you drop anything on your feet. You’ll also want ear protection like earmuffs to block loud noise from the mixer.
- Inspect the equipment. Look over the cement mixer carefully before using it. Check for any loose parts or damage. Make sure all guards are in place. Ensure the power cord is intact with no fraying or exposed wires.
- Follow manufacturer guidelines. Review the instruction manual to understand all safety procedures. Follow directions for setup, operation, and maintenance. Never disable or override any safety mechanisms.
- Avoid loose clothing. Baggy sleeves, dangling jewelry, or untied shoelaces could get caught in moving parts. Wear well-fitting clothes without accessories. Tie back long hair.
- Mind the environment. Only use the cement mixer on flat, stable, dry ground. Check for any trip hazards like rocks or tools nearby. Make sure the area is well-lit and ventilated.
- Practice caution. Keep your hands and feet away from moving parts while operating. Turn off and unplug the mixer before making any adjustments. Remain alert and focused when using the equipment.
Taking the proper safety precautions helps prevent accidents and injuries when operating a cement mixer. Protect yourself with the right gear and focus on safe setup, handling, and maintenance.
Step 2: Prepare the Cement mixer
Before adding any materials to the cement mixer, do a quick inspection and preparation. Follow these tips:
- Check the oil and refill if needed. The mixer has moving parts that need lubrication. Locate the oil reservoir and dipstick. The oil should be filled to the “Full” line on the dipstick. Top up with fresh oil if below that mark. Refer to your manual for the recommended oil type and weight.
- Check tire pressure. Cement mixers are heavy when loaded, so properly inflated tires are important. Use a pressure gauge to check the PSI in each tire, inflating or deflating as needed to the manufacturer’s recommended level. Having tires at uneven pressures can affect handling.
- Inspect the drum and paddles. Make sure the inside of the drum is clean, with no built-up concrete or debris. Check that the paddles are intact and move freely when rotating the drum by hand. Built-up concrete on the paddles can throw off the mixing.
- Check belts and motor. Open the motor housing and inspect the belts for cracks, fraying, or excessive wear. They should have proper tension without sagging. The motor should be free of dirt and dust buildup. Refer to the manual if belt adjustments or motor maintenance is needed.
- Lubricate as needed. Use grease to lubricate any zerks or grease fittings, particularly on pivot points like drum axles. This prevents wear and tear during mixing.
- Check safety controls. Make sure all guards are in place and the emergency stop button is functioning properly. Confirm the mixer will only operate when controls are engaged.
Following these pre-use checks and maintenance will help ensure your cement mixer is ready to start mixing safely and effectively. Let’s move on to adding the right ingredients in the proper order.
Step 3: Add sand and gravel
The ratio of sand to gravel is an important factor in concrete mix design. Generally, a mix ratio of 2 parts sand to 1 part gravel is recommended. However, this can vary depending on the size and type of aggregate used.
- Gather the required amounts of sand and gravel based on your concrete mix design. For a standard mix, use 2 buckets of sand for every 1 bucket of gravel.
- Add the sand first. Shovel or pour the sand into the empty concrete mixer drum. Spread it out evenly across the bottom of the drum.
- Next add the gravel on top of the sand. The gravel helps provide strength to the concrete, while the sand fills the gaps between the gravel pieces.
- Take care not to overfill the drum with sand and gravel. Leave room for the cement and water to be added next.
- Visually inspect the sand and gravel to ensure the mix looks uniform before moving to the next step. The materials should be well blended.
Proper proportioning of sand and gravel is critical for workable concrete with good finishing properties. Adjust the ratio if needed based on the aggregates used. Test samples may need to be batched to verify the ideal sand to gravel ratio.
Step 4: Add Cement
The amount of cement required will depend on the mix design being used. A standard general purpose mix is about 1 part cement, 2 parts sand, and 3 parts aggregate (gravel or crushed stone). For example, for a 1 cubic yard batch:
- 1 part cement would be about 5-6 bags of cement (94 lbs per bag)
- 2 parts sand would be about 2,500 lbs
- 3 parts aggregate would be about 3,750 lbs
So for a typical 1 cubic yard batch, you would add about 470-560 lbs of cement (5-6 bags). The cement should be added after the sand and aggregate to prevent clumping. Open each bag and slowly pour the cement over the sand and aggregate mix. Ensure it is distributed evenly. The cement acts as the glue to bind together the sand and aggregate into concrete.
Too much cement can make the concrete prone to cracking and shrinking. Too little can reduce the strength. Follow the mix design and don’t try to alter the amount of cement unless you have engineering expertise.
Step 5: Add Water
Adding the right amount of water is crucial for making good concrete. The water-cement ratio controls the strength and workability of the concrete mix. This ratio refers to the relative weights of water and cement materials.
The typical water-cement ratio is 0.45 to 0.60 by weight. This means you need 0.45 to 0.60 pounds of water per pound of cement. A lower water-cement ratio leads to higher strength concrete, while a higher ratio improves workability.
When adding water, aim for the minimum amount needed to fully hydrate the cement and provide adequate workability. Excess water will reduce strength and durability. The appropriate amount of water depends on the concrete application. For structural concrete, a maximum 0.45 ratio is recommended. For non-structural uses, up to 0.60 may be acceptable.
Follow these tips when adding water:
- Add it gradually and mix thoroughly to fully distribute the water and achieve uniform consistency
- Avoid adding too much at once, as this can cause segregation and bleeding
- Adjust water amounts based on slump tests to optimize workability
- Account for moisture in aggregates when calculating total water
Getting the water amount right is key for proper concrete hydration, strength gain, and long-term performance. Test mixes beforehand to determine the optimal water addition.
Step 6: Turn on mixer
Before adding any water, turn on the concrete mixer and let it mix the dry ingredients for a few minutes. This helps ensure the sand, gravel, and cement get evenly distributed before introducing the water.
With the mixer turned off, add your ingredients through the top opening in the order mentioned in the previous steps. Once everything is loaded in, secure the opening.
Now you can turn the mixer on. Start slowly at first, at the lowest speed setting. Let the dry mix tumble around for 2-3 minutes. This allows time for the sand, gravel and cement to fully integrate.
Gradually increase the mixer speed until you reach a medium pace. Visually inspect the concrete batch. All the dry components should be thoroughly blended with no noticeable clumps remaining.
At this stage, the concrete is ready for water to be added to start the chemical reaction. So turn off the mixer again before moving onto the next step.
Step 7: Add Admixtures
Admixtures are ingredients that can be added to concrete to modify its properties. Here are some common admixtures and when to use them:
Plasticizers
Plasticizers are used to increase the workability of concrete while reducing the water content. This results in higher strength concrete. Plasticizers allow concrete to be placed more easily without segregating. They are useful when working with low slump concrete.
Accelerators
Accelerators speed up the setting time of concrete. They are useful when working in cold weather conditions or when you need the concrete to set quickly. Calcium chloride is a common accelerator. Be careful not to add too much as it can cause cracking.
Retarders
Retarders slow down the setting time of concrete. They provide more working time for placing and finishing. Retarders are useful in hot weather to counteract accelerated setting. They also help when doing large pours that require concrete to remain workable for extended periods.
Air Entrainers
Air entrainers intentionally create small air bubbles in concrete. This increases resistance to damage from freezing and thawing cycles. Air entrainers are essential for concrete that will be exposed to freezing temperatures.
Add any admixtures according to the manufacturer’s specifications. Test batches may be needed to optimize dosages and achieve desired properties. Only add what is truly needed for your particular application.
Step 8: Mix thoroughly
Mixing concrete thoroughly is crucial for achieving a high quality and durable final product. The mixing time depends on the type and size of the batch, but generally requires 2-3 minutes of mixing after all ingredients have been added.
During mixing, observe the concrete to ensure all materials are blended evenly. The mixture should have a uniform color and consistency. If any lumps of cement or pockets of sand remain, continue mixing until fully incorporated.
For small batches under 1 cubic yard, mix for at least 2 minutes after adding all ingredients. Larger batches will require longer mixing times of 2.5-3 minutes. Set a timer when you start the mixer to keep track.
As the concrete mixes, the materials will integrate more and the consistency will become thicker. Stop mixing once the concrete appears smooth, with no dry pockets or segregation visible. Over-mixing can cause the cement to over-hydrate and compromise strength.
Proper mixing time is key for proper hydration reactions and bonding to occur within the concrete. Rushing the mixing risks weak spots and lower durability. Taking those extra minutes to thoroughly blend all particles together will pay off in the long run with stronger and longer-lasting concrete.
Step 9: Test the concrete
Performing a slump test is crucial to ensure your concrete mix is the proper consistency before pouring. Follow these steps:
- Dampen your slump cone and place it on a flat, level surface. The slump cone has an 8 inch top diameter, 4 inch bottom diameter, and is 12 inches tall.
- Fill the cone 1/3 full by volume with concrete from your mixer. Tamp it down with 25 strokes of your tamping rod.
- Fill the next 1/3 of the cone and tamp down another 25 strokes.
- Fill the final 1/3 to the top of the cone and tamp down another 25 strokes. The top should be slightly mounded above the cone.
- Carefully lift the cone straight up and set it next to the concrete. The concrete will slump down.
- Measure the vertical distance the concrete has slumped from the original height. This is your slump measurement.
- An ideal slump for most concrete projects is 3-4 inches. If the slump is less than 1 inch, the mix is too dry. If greater than 5 inches, it is too wet. Adjust water accordingly.
- Discard any excess concrete and clean your tools. The slump test is now complete!