
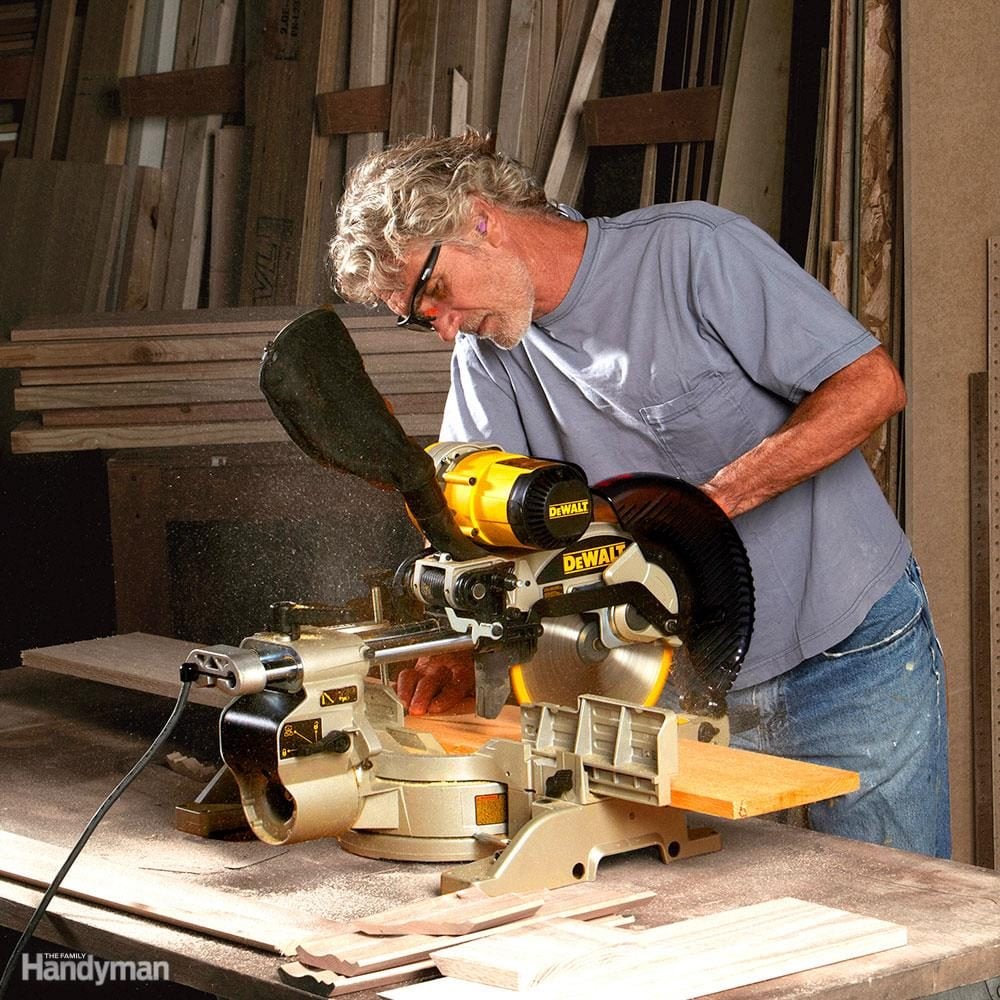
A miter saw is a specialized power tool used for making precise crosscuts and miters in wood, trim, and other materials. It consists of a circular saw blade mounted on a pivoting arm, allowing the blade to swing down and make cuts at various angles. Miter saws are designed to deliver clean, accurate cuts, making them essential tools for woodworking, carpentry, and construction projects.
There are different types of miter saws available:
- Standard Miter Saw: This is the most basic type of miter saw, which allows you to make straight crosscuts and miter cuts by pivoting the saw blade left or right.
- Compound Miter Saw: In addition to pivoting left and right, a compound miter saw can also tilt the blade to one side, enabling you to make compound miter cuts. This feature is particularly useful for cutting crown moldings and other trim pieces.
- Sliding Compound Miter Saw: This type of miter saw combines the features of a compound miter saw with a sliding mechanism that allows the saw blade to extend its cutting capacity. Sliding compound miter saws are ideal for cutting wider stock or making longer crosscuts.
The basic components of a miter saw include the saw blade, motor, fence, miter scale and lock, bevel adjustment, and a base or table to support the workpiece. Some models also include features like dust collection ports, laser guides, and LED work lights for improved visibility and accuracy.
Table of Contents
Uses and Applications
Miter saws are versatile power tools widely used in woodworking, construction, and DIY projects. Their primary function is to make precise angled cuts, making them indispensable for various applications:
Trim Work: Miter saws excel at cutting baseboards, door and window casings, chair rails, and other trim pieces. Their ability to make clean, accurate miters and bevels ensures tight-fitting joints for a professional finish.
Framing: In construction and carpentry, miter saws are essential for cutting studs, joists, and rafters to the required angles for framing walls, roofs, and other structures.
Crown Molding: Installing crown molding requires intricate compound miter cuts, which miter saws handle with ease. Their adjustable bevel and miter settings allow for perfect fitting corners.
Furniture Building: Woodworkers rely on miter saws for creating precise joints, such as mitered corners on tables, cabinets, and other furniture pieces.
Flooring: Miter saws are useful for cutting hardwood, laminate, or engineered flooring boards to fit around obstacles or at the edges of a room.
Deck Building: When constructing decks, miter saws are invaluable for cutting deck boards, railings, and other components to the appropriate angles.
Woodworking Projects: From picture frames and moldings to custom trim work and built-ins, miter saws enable woodworkers to achieve clean, accurate cuts for a wide range of projects.
With their ability to make precise angled cuts quickly and efficiently, miter saws have become an essential tool for professionals and DIYers alike, streamlining various woodworking and construction tasks.
Miter Saw Safety
Miter saws are powerful woodworking tools that require proper safety precautions to prevent injuries. One of the most crucial safety features is the blade guard, which covers the blade when not in use. Never disable or remove the blade guard, as it protects your hands from the spinning blade. Always wait for the blade to come to a complete stop before removing your hands or the workpiece from the saw.
Proper stance and body positioning are essential when operating a miter saw. Stand to the side of the blade’s path, never directly in line with the blade. Keep your hands and body parts away from the blade’s path, and use push sticks or blocks to guide the workpiece through the cut safely.
Clamping the workpiece securely is vital to prevent kickback, which can cause serious injuries. Use the saw’s built-in clamps or additional clamps to hold the workpiece firmly against the fence and table. Avoid holding the workpiece solely with your hands, as the blade’s rotation can cause the material to twist and bind.
Personal protective equipment (PPE) is mandatory when using a miter saw. Wear safety glasses or a face shield to protect your eyes from flying debris. Hearing protection, such as earplugs or earmuffs, is also recommended to prevent hearing damage from the saw’s noise. Avoid loose clothing, jewelry, or anything that could get caught in the spinning blade.
Choosing the Right Miter Saw
When it comes to selecting the right miter saw for your needs, several key factors should be considered. The blade size, bevel capacity, motor power, dust collection system, and the presence of laser guides can significantly impact the saw’s performance and user experience.
Blade Size:
The blade size is one of the most crucial considerations when choosing a miter saw. Larger blades, typically ranging from 10 to 12 inches, offer greater cutting capacity and can handle thicker and wider workpieces with ease. Smaller blades, such as 7-1/4 or 8-1/2 inches, are more compact and lightweight, making them ideal for jobsites or smaller workshops where portability is essential. However, they have limited cutting capacity and may require additional passes for thicker materials.
Bevel Capacity:
The bevel capacity refers to the saw’s ability to tilt and make angled cuts. Most miter saws can bevel to at least 45 degrees in one direction, but some models offer dual-bevel capabilities, allowing you to tilt the blade left and right. This feature is particularly useful for trimwork, crown molding, and other applications that require compound cuts. Consider your project requirements and choose a saw with a bevel capacity that meets your needs.
Motor Power:
The motor power determines the saw’s cutting performance and efficiency. More powerful motors, typically ranging from 12 to 15 amps, can handle tougher materials and make cleaner cuts with less strain on the saw. However, they tend to be heavier and may require a dedicated power source. Less powerful motors, around 10 amps or less, are suitable for lighter-duty tasks but may struggle with dense or thick materials.
Dust Collection:
Miter saws can generate a significant amount of sawdust, which can be a nuisance and potentially hazardous if inhaled. Look for saws with efficient dust collection systems, either built-in or compatible with shop vacuums. This feature not only helps maintain a cleaner work area but also improves visibility during cutting operations.
Laser Guides:
Many modern miter saws come equipped with laser guides that project a visible line onto the workpiece, indicating the blade’s path. This feature can greatly enhance accuracy and precision, especially for intricate cuts or when working with delicate materials. While not essential, laser guides can be a valuable asset, particularly for beginners or those seeking increased precision.
When choosing a miter saw, consider your specific needs, the types of materials you’ll be working with, and the level of precision required for your projects. By evaluating these key factors, you can select a saw that not only meets your current requirements but also offers room for future growth and versatility.
Setting Up a Miter Saw
Proper setup of your miter saw is crucial for safe and accurate cuts. Start by placing the saw on a stable, level work surface at a comfortable working height. Many woodworkers mount their miter saws on a dedicated stand or workbench to keep the saw secure and reduce fatigue during extended use.
Once the saw is positioned, extend the support wings or tables on either side of the saw. These provide additional support for long workpieces, preventing them from sagging or shifting during the cut. Adjust the extension wings so they are level with the saw table.
Next, check the alignment of the saw’s fence. The fence should be perfectly parallel to the blade when set at 0 degrees. Use a square or combination square to verify the alignment and make any necessary adjustments. A misaligned fence can cause binding and inaccurate cuts.
For repetitive cuts on multiple workpieces, consider using a stop block or flip stop. These handy accessories clamp onto the fence and provide a consistent stop point for your workpieces. Simply butt the workpiece against the stop block, and you’ll achieve identical cut lengths every time.
Finally, clear the area around the saw of any clutter or debris that could impede your movements or cause you to trip or lose your balance. Ensure you have plenty of room to operate the saw safely and maneuver larger workpieces without obstruction.
Miter Saw Blades
Miter saw blades come in various types designed for different materials and applications. The most common blade types are:
General Purpose Blades: These blades are suitable for cutting a wide range of materials, including wood, plywood, and soft plastics. They have a moderate number of teeth (typically 40-60) and are ideal for general woodworking tasks.
Fine Finish Blades: With a higher tooth count (60-80 teeth), fine finish blades produce smoother, cleaner cuts with less tear-out. They are recommended for trim work, cabinetry, and other projects where a clean, splinter-free cut is essential.
Plywood/Laminate Blades: These specialized blades have a high tooth count (80-100 teeth) and a unique tooth geometry designed to cut through plywood and laminate materials without chipping or splintering.
Metal-Cutting Blades: Featuring tungsten carbide or diamond-tipped teeth, these blades are designed specifically for cutting ferrous and non-ferrous metals, such as aluminum, steel, and copper.
Blade changeovers on miter saws are generally straightforward. Always unplug the saw and ensure the blade has come to a complete stop before attempting to change the blade. Refer to your saw’s manual for specific instructions, but the process typically involves loosening the arbor nut or bolt, removing the old blade, and installing the new blade, ensuring it is properly secured.
Proper blade maintenance is crucial for achieving accurate, clean cuts and prolonging the blade’s lifespan. Keep blades clean and free from pitch or resin buildup, which can cause binding and poor cut quality. Regularly check for dull or damaged teeth and replace the blade when necessary. Store blades properly to prevent damage or dulling.
Basic Miter Cuts
A miter saw is a versatile tool capable of making various types of cuts on wood, trim, and molding. Here are the basic cuts you can achieve with a miter saw:
Straight Cuts: This is the most fundamental cut made with a miter saw. The blade is positioned at a 90-degree angle to the fence, allowing you to make straight crosscuts on boards or trim pieces.
Miter Cuts: A miter cut is an angled cut made across the width of a board or trim piece. By adjusting the miter angle on the saw, you can cut at various angles for creating picture frames, crown molding, baseboards, and other trim work.
Bevel Cuts: A bevel cut is an angled cut made along the thickness of a board or trim piece. The blade tilts to one side, allowing you to cut beveled edges for projects like cabinet face frames or window sills.
Compound Cuts: A compound cut combines both a miter and bevel angle, creating an angled cut across the width and thickness of the material. These cuts are commonly used for crown molding and other intricate trim work, allowing you to create precise mitered corners with beveled edges.
To make these cuts accurately, it’s essential to understand the miter saw’s settings and adjustments. Most miter saws have easy-to-read scales or digital displays that allow you to set the desired miter and bevel angles. Always ensure the material is securely clamped or held against the fence and table before making a cut.
Advanced Techniques
Crown Molding Cuts: One of the most common advanced techniques with a miter saw is cutting crown molding. This intricate trim requires precise compound miter cuts to fit the molding pieces together at corners and angles. Mastering crown molding cuts involves understanding spring angles, nesting the molding upside down or right-side up on the saw, and making compound beveled cuts.
Coping Joints: For inside corner joints on moldings, coping is an alternative to miter cuts. Coping involves using a specialized coping saw or the miter saw blade to undercut one molding piece, allowing the second piece to fit over it seamlessly. This technique eliminates visible seams and produces a cleaner finished look.
Nested Cuts: When cutting wide boards or moldings that exceed the miter saw’s crosscut capacity, nested cuts become necessary. This involves making successive cuts by incrementally repositioning the workpiece, effectively “nesting” the cuts together. Careful layout and measurement ensure precise, seamless cuts.
Multi-Piece Cuts: For complex projects like frames or boxes, miter saws excel at cutting multiple pieces to precise lengths and angles for seamless assembly. This requires careful planning, layout, and execution to ensure all pieces fit together accurately. Techniques like stopped cuts, compound miters, and precise length measurements are crucial.
Maintenance and Care
Proper maintenance and care are crucial for ensuring your miter saw’s longevity, accuracy, and safety. Regular cleaning, lubrication, adjustments, and calibration will keep your saw in top condition and prevent unnecessary wear and tear.
Cleaning:
Sawdust and debris can accumulate quickly, so it’s essential to clean your miter saw regularly. Use a brush or compressed air to remove any buildup from the saw’s body, blade area, and fence. Wipe down the surfaces with a clean, dry cloth to remove any remaining dust or debris.
Lubrication:
Lubrication is essential for smooth operation and reducing friction between moving parts. Refer to your owner’s manual for specific lubrication instructions and recommended lubricants. Typically, you’ll need to lubricate the pivot points, blade arbor, and other moving components periodically.
Adjustments:
Over time, your miter saw’s adjustments may become loose or misaligned, affecting the accuracy of your cuts. Regularly check and adjust the blade’s alignment, fence squareness, and miter and bevel angle settings. Follow the manufacturer’s instructions for making these adjustments, and use a square or other precision tools to ensure accuracy.
Calibration:
Calibrating your miter saw is crucial for maintaining precise cuts. Most saws have built-in calibration mechanisms or procedures outlined in the owner’s manual. Check and calibrate the saw periodically, especially after any significant adjustments or if you notice inaccuracies in your cuts.
By following these maintenance and care steps, you’ll extend the life of your miter saw, ensure accurate and consistent cuts, and promote a safer working environment.
Brand Comparisons
When it comes to miter saws, there are several popular brands that stand out in the market. Each brand offers its unique features, capabilities, and price points, making it essential to understand their differences to make an informed decision.
DeWalt
DeWalt is a renowned brand known for its durable and powerful tools. Their miter saws are no exception, offering robust construction, accurate cutting capabilities, and a range of innovative features. DeWalt’s miter saws are typically priced in the mid-to-high range, reflecting their quality and performance. Some of their popular models include the DWS780 and the DHS790AT2.
Makita
Makita is another reputable brand that has gained a strong following among professionals and DIYers alike. Their miter saws are known for their precision, smooth operation, and efficient dust collection systems. Makita’s miter saws often come with advanced features like dual-bevel capabilities and LED lighting. Their prices are generally competitive, making them an attractive option for those seeking value and performance.
Bosch
Bosch is a brand that has built a reputation for innovation and precision in the power tool industry. Their miter saws are no exception, offering advanced features like axial-glide systems for increased cutting capacity and improved accuracy. Bosch’s miter saws are typically priced in the mid-to-high range, reflecting their quality and advanced technologies. Models like the GCM12SD and the CM10GD are popular choices among woodworkers and contractors.
Hitachi
Hitachi is another brand that offers a range of miter saws at various price points. While not as well-known as some of the other brands, Hitachi’s miter saws are known for their durability and affordability. Their models often come with features like laser guides and positive stops for increased accuracy. Hitachi’s miter saws can be a cost-effective option for those on a tighter budget.
RIDGID
RIDGID is a brand that focuses on providing durable and reliable tools for professional users. Their miter saws are no exception, offering robust construction and powerful motors. RIDGID’s miter saws are often priced in the mid-range, making them an attractive option for those seeking a balance between quality and affordability. Models like the R4122 and the R4123 are popular choices among contractors and woodworkers.
When comparing brands, it’s essential to consider factors such as cutting capacity, accuracy, power, and additional features like laser guides, dust collection systems, and bevel capabilities. Additionally, pricing and warranty coverage should be taken into account to ensure you get the best value for your investment.
Tips and Tricks
Miter saws are versatile tools, but with a few clever tips and tricks, you can unlock their full potential and work more efficiently. One game-changing accessory is a miter saw jig, which helps you make precise, repeatable cuts with ease. From simple jigs for cutting identical pieces to more complex setups for intricate angles, these handy guides can save you time and ensure accuracy.
Another handy trick is to invest in quality blades designed for specific materials. A fine-tooth blade will give you cleaner cuts on trim and molding, while a coarse-tooth blade excels at ripping through thicker stock. Keeping a few specialized blades on hand can make a world of difference in your results.
For those working with longer workpieces, consider using an outfeed support or roller stand to prevent the material from sagging or binding during the cut. This simple addition can improve safety and accuracy, especially when dealing with heavy or unwieldy stock.
Time-saving techniques like setting up stop blocks or using a laser guide can also streamline your workflow. Stop blocks allow you to make multiple cuts at the same length quickly, while a laser guide helps you visualize your cut line for precision positioning.
Finally, don’t overlook the power of proper blade maintenance. Keeping your blades clean, sharp, and properly aligned can extend their lifespan and ensure optimal cutting performance. Regularly cleaning the saw’s interior and checking for any loose components can also prevent issues down the line.
Miter Saw Projects
A miter saw is an incredibly versatile tool that can be used for a wide range of DIY projects around the home. With its ability to make precise angled cuts, a miter saw can help you tackle everything from simple trim work to more complex woodworking projects. Here are some inspiring miter saw project ideas to get you started:
Picture Frames
Creating custom picture frames is a great beginner project for a miter saw. You can cut the frame pieces to the desired size and join them together with precise 45-degree miter cuts. Experiment with different wood types, stains, and finishes to create unique and personalized frames.
Built-in Shelving
Add some built-in shelving to your home with the help of a miter saw. You can cut the shelf boards to the exact length needed and create clean, angled corners with miter cuts. This project is perfect for creating custom storage solutions in any room.
Wooden Planter Boxes
Elevate your gardening game by building your own wooden planter boxes. Use your miter saw to cut the boards to size and create clean, mitered corners. You can even add decorative trim or carvings to give your planters a personal touch.
Outdoor Furniture
Transform your backyard or patio with custom-built outdoor furniture. A miter saw is essential for cutting the precise angles needed for projects like Adirondack chairs, benches, and picnic tables. Choose weather-resistant wood for long-lasting outdoor pieces.
Crown Molding
Add a touch of elegance to any room by installing crown molding. With a miter saw, you can cut the intricate angles required for inside and outside corners, ensuring a seamless and professional-looking finish.
Cutting Boards
Craft personalized cutting boards for your kitchen using a miter saw. You can create unique designs by combining different wood types and patterns, and even add grooves or juice channels for added functionality.
Wooden Signs and Decor
Unleash your creativity by making custom wooden signs, wall art, and home decor pieces with your miter saw. Cut intricate shapes, letters, and patterns to create one-of-a-kind pieces that reflect your personal style.
Remember, when tackling any miter saw project, always prioritize safety by wearing appropriate protective gear and following proper operating procedures. With a little creativity and the precision of a miter saw, you can transform your home with beautiful, handcrafted woodworking projects.