What is a U Joint Puller?
A U joint puller, also known as a universal joint puller or U-joint remover, is a specialized tool designed to safely and efficiently remove universal joints (U-joints) from driveshafts or other components in vehicles. Universal joints are crucial components in the drivetrain system, allowing for the smooth transmission of power from the engine to the wheels while accommodating the varying angles between the driveshaft and other components.
The primary purpose of a U joint puller is to facilitate the removal of these joints without causing damage to the surrounding components or the joints themselves. This tool is particularly useful when performing maintenance, repairs, or replacements on the driveshaft, differential, or other related parts.
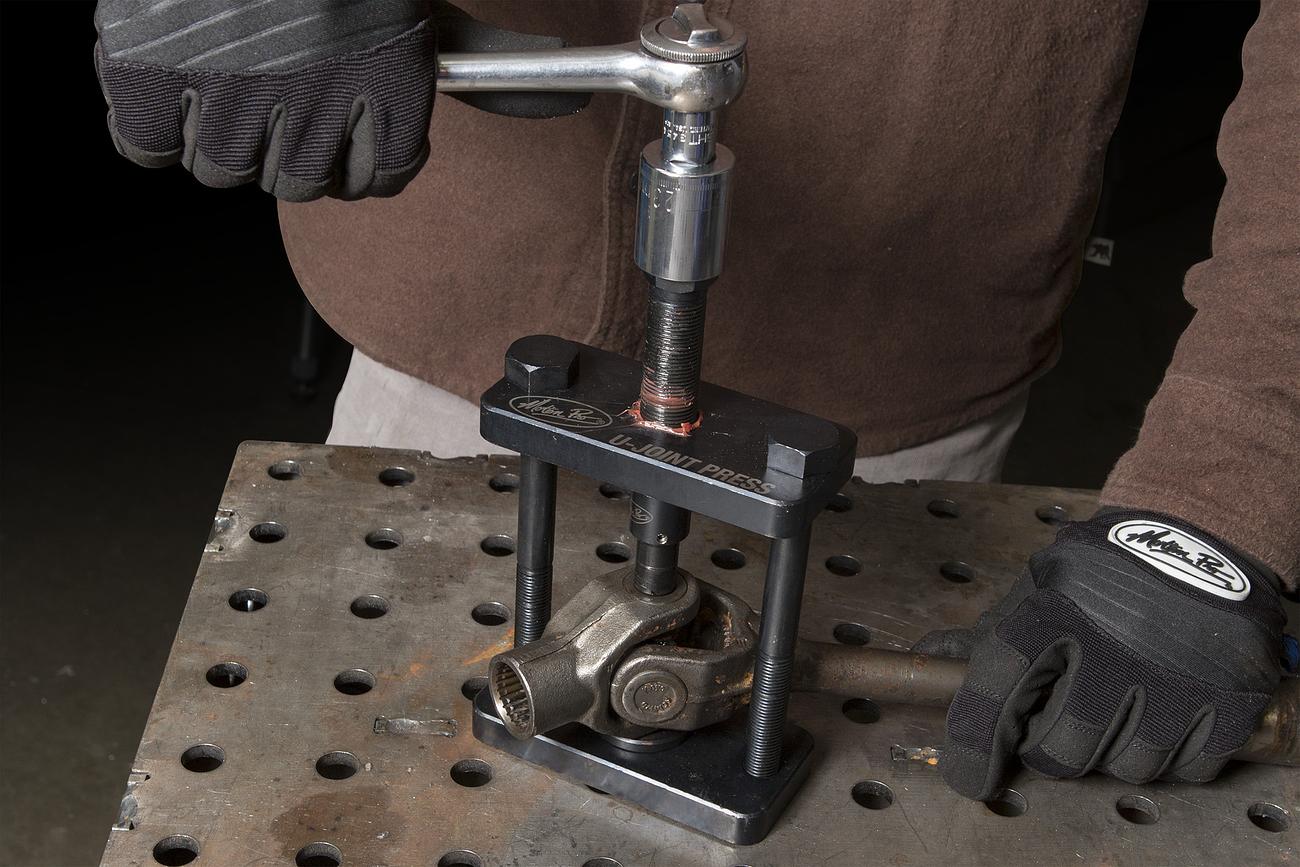
A U joint puller typically consists of a sturdy metal frame or housing, adjustable arms or claws that grip the U-joint, and a central threaded shaft or puller mechanism. The adjustable arms or claws are designed to securely grip the U-joint caps or bearings, ensuring a firm hold during the removal process. The central threaded shaft or puller mechanism applies controlled force, gradually separating the U-joint from its mounting point without the need for excessive force or prying, which could potentially cause damage.
Table of Contents
Types of U Joint Pullers
There are several types of U joint pullers available, each designed for specific applications and purposes. Here are some of the most common types:
Scissor-Type U Joint Puller
The scissor-type U joint puller is one of the most widely used varieties. It features two arms that resemble a pair of scissors, with jaws that grip the U joint cap or cross. As the handles are closed, the jaws apply pressure and pull the U joint apart. These pullers are versatile and can be used on various sizes of U joints.
Fork-Type U Joint Puller
The fork-type U joint puller is designed specifically for removing U joint caps. It consists of a fork-like tool with two prongs that fit into the grooves of the U joint cap. A threaded shaft is then tightened, applying force to the prongs and pushing the cap off the U joint. These pullers are often used in conjunction with other tools for complete U joint removal.
Slide Hammer U Joint Puller
A slide hammer U joint puller is a heavy-duty tool that combines a slide hammer mechanism with a puller attachment. The slide hammer provides a powerful striking force, while the puller attachment grips the U joint cap or cross. This type of puller is ideal for stubborn or seized U joints that require significant force to remove.
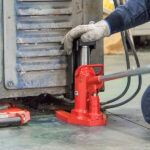
Hydraulic U Joint Puller
Hydraulic U joint pullers are designed for heavy-duty applications and are commonly used in industrial or commercial settings. These pullers utilize hydraulic pressure to generate immense pulling force, making them suitable for removing even the most stuck or corroded U joints. They typically consist of a hydraulic cylinder, a puller attachment, and a pump for generating the necessary pressure.
Universal U Joint Puller
As the name suggests, universal U joint pullers are designed to work with a wide range of U joint sizes and configurations. They often feature adjustable jaws or arms that can be adapted to fit different U joint dimensions. Universal pullers offer versatility and can be a cost-effective solution for those working with various types of U joints.
Each type of U joint puller has its strengths and applications, and the choice ultimately depends on the specific requirements of the job, the size and condition of the U joint, and the available tools and resources.
When to Use a U Joint Puller
A U joint puller is an essential tool for any automotive technician or DIY mechanic working on driveshafts or other components involving universal joints (U-joints). These specialized tools are designed to separate the U-joint from the yoke or shaft, allowing for proper disassembly, inspection, and replacement of worn or damaged parts.
Situations that typically require the use of a U joint puller include:
Driveshaft Removal or Replacement
When removing or replacing the driveshaft on a vehicle, the U-joints must be separated from the yokes or shafts at both ends. A U joint puller is necessary to safely and effectively disengage these components without causing damage.
U-Joint Inspection or Replacement
Over time, U-joints can wear out due to constant movement, exposure to dirt and debris, or lack of proper lubrication. If a U-joint is suspected of being worn or damaged, a puller is required to separate it from the driveshaft for inspection or replacement.
Driveline Vibrations or Noise
Excessive vibrations or unusual noises coming from the driveline can be indicative of worn U-joints. Using a U joint puller to disassemble the driveshaft allows for a thorough inspection and replacement of any faulty components.
Preventive Maintenance
As part of regular preventive maintenance, some mechanics prefer to remove and inspect U-joints periodically, even if no immediate issues are present. A U joint puller is essential for this process, ensuring proper disassembly and reassembly.
Driveline Modifications or Upgrades
When modifying or upgrading a vehicle’s driveline components, such as installing a performance driveshaft or upgrading U-joints, a puller is necessary to separate the existing components for replacement.
In general, whenever working on the driveshaft or components involving U-joints, a U joint puller is an indispensable tool that ensures safe and effective disassembly and reassembly, minimizing the risk of damage and ensuring proper maintenance or repairs.
How to Use a U Joint Puller
Using a U joint puller is a straightforward process, but it’s crucial to follow the proper steps to ensure safety and effectiveness. Here’s a step-by-step guide on how to use a U joint puller:
- Prepare the Work Area: Clear the area around the U joint you’ll be working on, ensuring you have enough space to move freely and safely. Make sure the vehicle is properly secured and supported on jack stands or a lift.
- Disconnect the Driveshaft: Before attempting to remove the U joint, you’ll need to disconnect the driveshaft from the differential and transmission. Consult your vehicle’s repair manual for specific instructions on how to do this safely.
- Clean the U Joint Area: Use a wire brush or a rag to remove any dirt, grease, or debris from the U joint and surrounding area. This will help ensure a better grip for the puller tool and prevent any contamination.
- Secure the U Joint Puller: Position the U joint puller over the U joint you want to remove. Ensure that the puller’s jaws or claws are securely gripping the U joint’s cap or bearing cup. Tighten the puller’s bolts or screws to secure it in place.
- Attach the Slide Hammer: Most U joint pullers come with a slide hammer attachment. Connect the slide hammer to the puller’s center shaft or bolt, making sure it’s securely attached.
- Apply Force: Once everything is securely in place, use the slide hammer to apply a sudden, forceful pull. You may need to repeat this step several times, applying more force with each pull, until the U joint breaks free.
- Remove the U Joint: After the U joint has been dislodged, carefully remove the puller tool and the U joint from the driveshaft or yoke.
- Inspect and Clean: Inspect the driveshaft and yoke for any damage or debris. Clean the area thoroughly before installing the new U joint.
Remember, it’s essential to follow the manufacturer’s instructions for your specific U joint puller and to wear appropriate personal protective equipment, such as gloves and safety glasses, throughout the process.
Safety Precautions
When using a U joint puller, it’s crucial to follow proper safety guidelines to prevent injuries and ensure the job is done correctly. Here are some important precautions to keep in mind:
- Wear appropriate personal protective equipment (PPE) such as safety glasses, gloves, and sturdy work boots to protect yourself from potential hazards.
- Ensure the work area is clean and free from clutter, providing ample space to maneuver the U joint puller and the vehicle or equipment you’re working on.
- Secure the vehicle or equipment properly, using wheel chocks or jack stands to prevent accidental movement during the removal process.
- Inspect the U joint puller and its components before use, checking for any signs of damage, wear, or missing parts. Replace or repair any defective components to avoid potential failures.
- Follow the manufacturer’s instructions carefully, as each U joint puller may have specific guidelines for safe and proper use.
- Apply the appropriate amount of force gradually and evenly, avoiding sudden jerks or excessive force that could damage the components or cause the puller to slip.
- Keep your hands, fingers, and other body parts clear of pinch points and moving parts during the removal process to prevent injuries.
- Use proper lifting techniques when handling heavy components, and seek assistance if necessary to avoid straining your back or other muscles.
- Ensure the U joint puller is securely attached and properly aligned before applying force, as improper setup can lead to equipment damage or personal injury.
- Be aware of your surroundings and maintain a stable footing throughout the process to prevent slips, trips, or falls.
By following these safety precautions, you can minimize the risks associated with using a U joint puller and ensure a successful and injury-free removal process.
Maintenance and Care
Proper maintenance and care of your U joint puller are essential to ensure its longevity and optimal performance. Here are some tips to keep your tool in top condition:
- Clean After Use: After each use, thoroughly clean the puller to remove any grease, dirt, or debris. Use a degreaser or solvent to dissolve stubborn grime, and a wire brush to scrub off any stuck-on material.
- Lubricate Moving Parts: Apply a thin layer of lubricant to the threaded rod and any other moving parts to prevent rust and ensure smooth operation. Use a high-quality, heavy-duty lubricant suitable for automotive tools.
- Inspect for Damage: Regularly inspect the puller for any signs of wear, cracks, or damage. Replace any worn or damaged parts immediately to prevent further deterioration and potential safety hazards.
- Proper Storage: Store the U joint puller in a dry, clean environment, away from moisture and extreme temperatures. Consider using a tool chest or cabinet to protect it from dust and debris.
- Handle with Care: Avoid dropping or mishandling the puller, as this can cause dents, bends, or other damage that may affect its performance and safety.
- Follow Manufacturer’s Instructions: Refer to the manufacturer’s instructions for any specific maintenance or care recommendations for your particular U joint puller model.
By following these simple maintenance and care tips, you can extend the lifespan of your U joint puller and ensure it remains a reliable and efficient tool for years to come.
Common Issues and Troubleshooting
Using a U joint puller can present some challenges if not done correctly. One common issue is the puller slipping off the U joint cap or not gripping securely. This can happen if the puller is not properly aligned or if there is dirt, grease, or rust preventing a tight fit. To troubleshoot this, ensure the puller is centered and seated correctly, and clean the surfaces thoroughly before attempting removal.
Another potential problem is the U joint cap becoming stuck or seized, making it difficult to remove even with the puller in place. In such cases, applying penetrating oil or heat can help break the rust and corrosion bond. Gently tapping the puller with a mallet or striking the yoke with a dead blow hammer can also help dislodge a stubborn U joint cap.
If the U joint puller is not exerting enough force to remove the cap, it may be necessary to use a larger or more powerful puller tool. Attempting to force a puller that is too small or inadequate can damage the U joint or surrounding components.
Lastly, it’s essential to exercise caution when using a U joint puller, as the sudden release of tension can cause the puller or components to fly off unexpectedly. Always wear appropriate safety gear, such as gloves and eye protection, and ensure a secure footing and proper body positioning to avoid potential injuries.
Choosing the Right U Joint Puller
Selecting the appropriate U joint puller is crucial for ensuring a safe and efficient removal process. Several factors should be considered when choosing the right tool for the job:
Size and Compatibility: U joint pullers come in various sizes to accommodate different vehicle makes and models. It’s essential to choose a puller that is compatible with the specific U joint you need to remove. Using an incorrectly sized puller can damage the joint or the surrounding components.
Material and Construction: U joint pullers are typically made from high-strength steel or forged alloys to withstand the forces involved in the removal process. Look for pullers with a sturdy construction and high-quality materials to ensure durability and longevity.
Puller Type: There are different types of U joint pullers available, including two-jaw pullers, three-jaw pullers, and slide hammer pullers. Each type has its advantages and is better suited for specific applications. Consider the accessibility and clearance around the U joint when selecting the appropriate puller type.
Ease of Use: Some U joint pullers are designed with features that make them easier to use, such as ergonomic handles, quick-release mechanisms, or adjustable jaws. These features can save time and reduce the physical effort required during the removal process.
Brand Reputation: Choose a U joint puller from a reputable brand known for producing high-quality tools. Reputable brands often offer better warranties and customer support, ensuring you have a reliable tool that will last for years.
Application and Environment: Consider the specific application and environment in which you’ll be using the U joint puller. If you’ll be working in tight spaces or harsh conditions, you may need a more compact or durable puller that can withstand those challenges.
By considering these factors, you can select a U joint puller that is well-suited for your specific needs, ensuring a safe and efficient removal process while minimizing the risk of damage to the vehicle or personal injury.
Alternatives to U Joint Pullers
While U joint pullers are specifically designed for removing universal joints, there are a few alternative tools or methods that can be employed in certain situations:
Pickle Fork
A pickle fork is a type of pry bar with a forked end. It can be used to separate the U joint caps from the yoke by carefully prying and wiggling the caps off. However, this method requires more effort and carries a higher risk of damaging components.
Slide Hammer Puller
Some mechanics use a slide hammer puller with the appropriate adapter to pull U joints off the yoke. This method involves attaching the puller to the U joint cap and using the weight and sliding action to provide the necessary force for removal.
Heat Application
In some cases, applying heat to the U joint caps can help break the rust and allow for easier removal. This should be done carefully and with proper safety precautions to avoid overheating and damaging the components.
Penetrating Lubricants
Soaking the U joint caps with a penetrating lubricant can help loosen stuck components. This method may need to be combined with other techniques, such as prying or pulling, for successful removal.
Replacement
In cases where the U joint is severely damaged or seized, it may be more practical to replace the entire driveshaft assembly rather than attempting to remove the U joint. This decision depends on the condition of the components and the associated costs.
While these alternatives can work in certain situations, it’s important to exercise caution and follow proper procedures to avoid damaging the vehicle’s components. U joint pullers remain the recommended tool for safe and efficient U joint removal.
U Joint Puller Applications
U joint pullers are essential tools used across various industries and applications where the removal or installation of universal joints (U-joints) is required. These tools are commonly employed in the automotive industry, heavy machinery and equipment maintenance, and agricultural equipment repair. Here are some common applications and industries that rely on U joint pullers:
Automotive Industry
- Driveshaft repair and maintenance
- Removal and installation of U-joints on front and rear axles
- Servicing transfer cases and differentials
Heavy Machinery and Equipment
- Maintenance and repair of construction equipment, such as excavators, bulldozers, and cranes
- Servicing of mining equipment, including haul trucks and drilling rigs
- Repair and overhaul of industrial machinery and components
Agricultural Equipment
- Maintenance and repair of tractors, combines, and other farm machinery
- Servicing of implements and attachments with U-joints, such as hay balers and planters
Marine Industry
- Repair and maintenance of propeller shafts and U-joints on boats and ships
- Servicing of marine equipment with U-joint components
Motorsports
- Maintenance and repair of race cars, off-road vehicles, and motorcycles
- Servicing of driveline components, including U-joints, in high-performance applications
U joint pullers are versatile tools that can be used in various settings, from professional automotive repair shops and heavy equipment maintenance facilities to DIY projects and home garages. Their ability to efficiently remove and install U-joints makes them an indispensable tool for anyone working with driveline components and universal joints.
Tips and Tricks
- Lubricate the U-joint puller threads before use to ensure smooth operation and prevent seizing or damage.
- Use a mallet or hammer to gently tap the puller arms into place, rather than forcing them, to avoid damaging the U-joint caps.
- For stubborn U-joints, apply heat to the cap or yoke before attempting removal to help break the seal and ease disassembly.
- When reassembling, make sure the U-joint is properly aligned and seated before tightening to prevent binding or premature wear.
- Keep a set of different sized U-joint pullers on hand to handle various vehicle applications and joint sizes.
- Regularly inspect the puller for wear or damage, and replace components as needed to maintain proper function and safety.
- Use a torque wrench to ensure proper tightening of the puller arms to the specified torque value, avoiding over-tightening or under-tightening.
- For particularly challenging U-joints, consider using a dedicated U-joint press tool or seeking professional assistance to avoid damaging components.